Vista has been around for some time now and folks either think it's okay (having worked out all the kinks for themselves) or they hate it. Now comes the long awaited Service Pack 1 and, in true Vista style, it either installs without a hitch or it drives you to drink with it's quirky installer.
For some folks, it's just another easy Windows Update but for others it's a real chore even getting Service Pack 1 to show up on Windows Update. The problem, it seems, is that the installer will not function at all unless all the "required" previous updates are already successfully installed (and these vary slightly depending on your particular version of Vista) and unless all your programs are fully compatible with this version of Vista. Also, make sure to update all your drivers as this will help a lot.
Even so, if you're lucky enough to get Service Pack 1 successfully installed you may still have odd and unusual problems. Many folks, myself included, had found it impossible to access the Vista Security page after installing Service Pack 1 because of a security feature called "DEP". If you have your own good security setup you can disable this program (DEP) quite easily. I can provide instructions how this can be done but I must add that Microsoft does not recommend this. You're on your own with that one. Incidentally, Microsoft is providing "No Charge" service until May of 2009 for Service Pack 1 problems. They couldn't help me. I had to figure it out on my own. Perhaps you'll have better luck!
In short, Service Pack 1 is problematic and not ready for the average home user yet. Good luck!
Monday, May 12, 2008

Thursday, January 24, 2008
Clear your Firefox download list.
If you have been noticing that Firefox downloads have been getting slower and slower, it's probably because your list of items that Firefox has already downloaded is getting longer as time goes on. So why not clean out the list altogether. Using "Control J" will bring up a drop down menu showing all the items Firefox has previously downloaded. Just click the "Clean and Close" button and they're all gone. Now you can start fresh.
Wednesday, December 05, 2007
Add A Toolbar To Your Desktop
Windows XP
1. Right click an empty area on the taskbar.
2. Point to "Toolbars", then click the toolbar you want to add.
3. The new Toolbar lets you place a shortcut to a folder on the taskbar.
Note:
You can resize the toolbar or move it to another location on the taskbar by pointing to the vertical bar on the left side of the toolbar and dragging it to the left or right.
You can create a floating toolbar by dragging it from the taskbar to the desktop.
To remove a toolbar, right click on an empty area of the taskbar, Point to "Toolbars" and then remove the check mark from the toolbar you want to remove
Windows Vista
The trick in Vista is to go to the desktop and create a plain folder, then, when you drag it to the top of the desktop, it turns into a toolbar. Here's how you do it: click on the yellow folder on the desktop and now, with the left mouse, drag the folder to the very top border, then let go. Dragging the folder to the side of the desktop did not work for me. A promising sign was when the mouse displayed a plus sign(+). At that point I let go and the toolbar magically appeared.
Once the toolbar is created you can drag shortcuts into it just like any other toolbar.
What a handy way to clean up some of the extra stuff on your desktop!
1. Right click an empty area on the taskbar.
2. Point to "Toolbars", then click the toolbar you want to add.
3. The new Toolbar lets you place a shortcut to a folder on the taskbar.
Note:
You can resize the toolbar or move it to another location on the taskbar by pointing to the vertical bar on the left side of the toolbar and dragging it to the left or right.
You can create a floating toolbar by dragging it from the taskbar to the desktop.
To remove a toolbar, right click on an empty area of the taskbar, Point to "Toolbars" and then remove the check mark from the toolbar you want to remove
Windows Vista
The trick in Vista is to go to the desktop and create a plain folder, then, when you drag it to the top of the desktop, it turns into a toolbar. Here's how you do it: click on the yellow folder on the desktop and now, with the left mouse, drag the folder to the very top border, then let go. Dragging the folder to the side of the desktop did not work for me. A promising sign was when the mouse displayed a plus sign(+). At that point I let go and the toolbar magically appeared.
Once the toolbar is created you can drag shortcuts into it just like any other toolbar.
What a handy way to clean up some of the extra stuff on your desktop!
Friday, October 19, 2007
Create an Emergency Rescue Disc!
Did you create a rescue disk when you installed Windows? If not,
or if you can longer locate it, you may want to make sure that you have
one on hand in case a technical problem (usually a problematic new
program which you just installed) prevents your computer from booting.
Here's how in Windows:
CREATE YOUR RESCUE DISK
1. Insert a blank (empty) formatted floppy disk in your floppy drive.
2. Open your Control Panel, accessing it through My Computer, or
through Start, Settings.
3. Double click on Add/Remove Programs.
4. Open the Startup Disk tab, and click on Create Disk.
5. Allow Windows to create your bootable floppy disk.
6. Also, open your Windows directory, and copy your Windows
registry files -- system.dat and user.dat
7. When done, label it as your bootable floppy disk.
8. For extra security, make TWO bootable rescue disks.
9. Test them out. Turn off your computer, then place your rescue
disk in your floppy drive, wait 30 seconds, then turn on your
computer again. You should be able to boot into Windows.
Enter in the SAFE mode to troubleshoot further.
or if you can longer locate it, you may want to make sure that you have
one on hand in case a technical problem (usually a problematic new
program which you just installed) prevents your computer from booting.
Here's how in Windows:
CREATE YOUR RESCUE DISK
1. Insert a blank (empty) formatted floppy disk in your floppy drive.
2. Open your Control Panel, accessing it through My Computer, or
through Start, Settings.
3. Double click on Add/Remove Programs.
4. Open the Startup Disk tab, and click on Create Disk.
5. Allow Windows to create your bootable floppy disk.
6. Also, open your Windows directory, and copy your Windows
registry files -- system.dat and user.dat
7. When done, label it as your bootable floppy disk.
8. For extra security, make TWO bootable rescue disks.
9. Test them out. Turn off your computer, then place your rescue
disk in your floppy drive, wait 30 seconds, then turn on your
computer again. You should be able to boot into Windows.
Enter in the SAFE mode to troubleshoot further.
Monday, August 27, 2007
Use Your Mouse to Resize Icons in Vista
Let us start with a quick, easy, yet flashy Vista tip. We are going to resize the desktop icons by holding down the Ctrl key, and scrolling the mouse wheel. See how icons such as the Recycle Bin enlarge or shrink as you turn the mouse's wheel. By scrolling you can get over 20 different sizes of icon, there is bound to be one that suits you. Incidentally, this a classic for learning a tip once, on the Vista Desktop, and then applying wherever you go, for example try Ctrl + scroll the mouse wheel when you are next in Windows Explorer.
Check PC Health in Vista
If you would like to check your PC’s health:
Open up Control Panel and click on the Performance Information and Tools icon. Than open Advanced tools from the list on the left hand side of the screen. Click on the Generate a system health report option at the bottom of the list. This will provide you with a list of any problems the system may be experiencing and some suggestions on how to correct them.
Tuesday, June 05, 2007
Time and Time Again (Vista)
This one’s interesting. Open up the Date and Time applet in the Control Panel. Flip to the “Additional Clocks” tab. There, you can configure two more clocks from different time zones. They’ll appear in the tooltip when you hover over the Taskbar clock. No additional software (or silly sidebar widgets) necessary. Cool!
Tuesday, April 24, 2007
Remember Your Info! (Firefox)
InFormEnter adds a small, clickable icon next to every input field in a web form, from where you can select the item to be inserted - no typing required. You can configure it to display your frequently used information such as name, email, address and whatever else you want to be available from the form menu.
So, if you can't remember all the bits and pieces of your info, InFormEnter is for you. This small program resides on your own computer (nothing is sent out online, for security purposes). You can add as many items to the program as you wish and this download supports multiple profiles for multiple users. To use, you just click on the new icon next any input field and then click on the item you want inserted. Note that this program works with secure sites (such as financial institutions, for example) so you will wish to use caution if your computer has one user account, but is accessible by others. This add-on is for Firefox and is compatible with Windows (up to and including Vista).
So, if you can't remember all the bits and pieces of your info, InFormEnter is for you. This small program resides on your own computer (nothing is sent out online, for security purposes). You can add as many items to the program as you wish and this download supports multiple profiles for multiple users. To use, you just click on the new icon next any input field and then click on the item you want inserted. Note that this program works with secure sites (such as financial institutions, for example) so you will wish to use caution if your computer has one user account, but is accessible by others. This add-on is for Firefox and is compatible with Windows (up to and including Vista).
Tuesday, April 17, 2007
Windows Media player for Firefox, XP and/or Vista
Good news for those folks that are using Firefox (XP and/or Vista) and wish also to use Windows Media Player. A new and compatible Windows Media Player Plug-in for Firefox has just been released. Now you don't have to use Internet Explorer for all your Windows Media Player content. The new plug-in is available here or by clicking on the title line of this posting. Enjoy!
Monday, April 16, 2007
Feeling "Compatible" with Vista
One concern for Windows XP users is if their favorite software applications will run once they upgrade to Vista.
Luckily, Windows Vista uses a feature called Compatibility Mode which tells the software application that Vista is actually an older OS, specifically Windows 95, 98, Me, NT, 2000, or XP.
Here's how it works:
If your software application won't install, open or work properly, right click on the application's .exe file. Select Properties and then click the Compatibility tab. From there, pick the previous Windows operating system you were on (most likely Windows XP). If you're a system operator, you can set this up as an administrator to make it easier for your staff.

(Information in this tip courtesy of McGraw-Hill)
Here's a little Vista trick you can use in the meantime!
Enable Hidden BootScreen in Windows Vista
The Windows Vista BootScreen is pointless, but Microsoft decided to hide a more visually appealing boot screen that can easily be enabled with very little trouble. I’m not sure why they didn’t make the boot screen better.
- Press Win+R, type msconfig and press Enter.
- If User Account Control prompts you to allow the action, click on Continue.
- In the "System Configuration" window, click on the Boot tab.
- Select your Windows Vista installation and under "Boot options", check "No GUI boot". Press OK.
- In the dialog that appears, check "Don’t show this message again", and then click on Restart.
- Your computer will now reboot, and you will see the Aurora boot screen with text that says "Starting Windows Vista".
Note: You may get a Windows Defender error on the next startup. You can enable the system config utility using the tray icon and this error will go away.
Thursday, March 08, 2007
Daylight Savings Time Changes
Just a reminder of the new Daylight Savings Time dates. Daylight Saving Time now begins at 2.00 AM Sunday, March 11th and your computer clock may not be programmed to reflect this new change. If you are running Vista, your system is already programmed for this. If you are running XP AND if you are completely current with your Windows Updates, the small adjustment program will have already been downloaded as an update and installed to correct your clock on the appropriate day.
If either of these situations is not applicable to your operating system, Microsoft is providing a patch which can be obtained here. For Mac users, Apple is providing a similar patch from the download section of their site.
"The times, they are a-changing!"
If either of these situations is not applicable to your operating system, Microsoft is providing a patch which can be obtained here. For Mac users, Apple is providing a similar patch from the download section of their site.
"The times, they are a-changing!"
Thursday, March 01, 2007
I've been "Bested"
I've just learned the hard way to not entrust your stuff to a certain well-known computer "big box" store. They trashed the whole thing and even after I took it to a "real" tech person, it couldn't be saved. Just a word to the wise. Big name doesn't mean good quality. That's the end of my rant.
Monday, January 22, 2007
Power Point Viewer 2007
If you don't have Microsoft Power Point installed on your computer, you can still view Power Point Presentations. The new Power Point Viewer 2007 has just been released (replacing the 2003 version). Just download and install it and you will be able to view presentations created using all versions of Power Point from Windows 98 up to and including the soon to be released Windows Vista . You can get the new viewer here.
Friday, January 12, 2007
IE7 Not Working At Some Sites?
I love this application. It is a very cool utility that opens an Internet Explorer 7.0 window which is configured to report its identity to websites as being Internet Explorer 6.0 - an excellent way to work with Web sites that are improperly coded to only recognize IE6 and earlier. Just click here to get it.
This is much easier than messing around with the registry, and most importantly, other instances of Internet Explorer 7 will not be affected. It makes testing Web sites so very much easier.
Thursday, January 04, 2007
Photos The Wrong Size? (Windows)
Photo Resizer is a free utility developed for digital-camera owners, Webmasters, or anybody who quickly wants to resize a photo for e-mail or to publish on a Web site. There is no need to open a photo editor or e-mail client. Open the photo in PhotoResizer, resize it, and e-mail it to a friend, colleague, or your office. It also takes the addresses from your e-mail-client's address book. It's an excellent tool for Webmasters. Resize any photo to upload to your Web site. Did I mention that this little item is FREE? Just click on this link!
Back To Top
Back To Top
Tuesday, December 12, 2006
Do The Kids Push Your "Power" Button?
This is for anyone with small children that like to come along and push the power button on the computer, usually right when you're in the middle of something.
Go to "Control Panel","Power", "Options" and click on the "Advanced" tab. In the drop box called "When I press the power button on my computer" set to either "Do nothing" or "Ask me what to do". The first is self-explanatory, and the second brings up the option window when you click "Turn off computer" on the Start menu.
Now you won't have those little fingers coming along while you are in the middle of something and turning the computer off on you and causing you to lose what you're working on.
I haven't come across something similar for the Reset button (if present) other than to disconnect it from the motherboard. Then again if your computer has frozen to the point that you need to reset, flipping the switch on the power supply will accomplish the same thing.
(Thanks to "Stormy 13" - P.C Pitstop for this tip.)
Back To Top
Go to "Control Panel","Power", "Options" and click on the "Advanced" tab. In the drop box called "When I press the power button on my computer" set to either "Do nothing" or "Ask me what to do". The first is self-explanatory, and the second brings up the option window when you click "Turn off computer" on the Start menu.
Now you won't have those little fingers coming along while you are in the middle of something and turning the computer off on you and causing you to lose what you're working on.
I haven't come across something similar for the Reset button (if present) other than to disconnect it from the motherboard. Then again if your computer has frozen to the point that you need to reset, flipping the switch on the power supply will accomplish the same thing.
(Thanks to "Stormy 13" - P.C Pitstop for this tip.)
Back To Top
Tuesday, November 21, 2006
IE7 & Firefox 2.0 both released.
Recently Microsoft released the latest version of it's browser Internet Explorer 7. At about the same time Mozilla released the latest version of it's browser Firefox 2.0. I have used them both and I find that IE7, while looking a little different than it did in it's earlier versions, essentially functions in the same fashion, albeit with a lot of new security advancements and the addition of "tabbed" browsing capabilities. Firefox 2.0 is a stable version with more security features than ever. It looks and functions much like it's previous versions. I believe Firefox 2.0 to be much more secure than IE7, so it will continue, at present, to be my default browser.
I would recommend that both of these browsers should be tried on for size, and with an open mind, before anyone should make any firm decisions as to their browser of choice.
Back To Top
I would recommend that both of these browsers should be tried on for size, and with an open mind, before anyone should make any firm decisions as to their browser of choice.
Back To Top
Tuesday, October 24, 2006
Reclaim Your Inbox - Thunderbird
I have recently begun using Mozilla Thunderbird to access my POP Mail instead of Outlook Express. I like Thunderbird because of it's included Security Applications, it's ease of use, and also the ability to customize to my preferences by adding "extensions", much as one does in the Mozilla Firefox Browser. All settings and mail are easily imported from OE or other mail programs. In addition, Thunderbird can be configured to access mail from most other POP mail sources including, by the way, GMail.
I've been using Thunderbird for a couple of months now and I'm really pleased with the program as a whole. So, as Mozilla says, "Take Back Your Inbox" with Thunderbird. It is, of course, an absolutely FREE download.
Back To Top
I've been using Thunderbird for a couple of months now and I'm really pleased with the program as a whole. So, as Mozilla says, "Take Back Your Inbox" with Thunderbird. It is, of course, an absolutely FREE download.
Back To Top
Monday, October 02, 2006
Fetch Your Product Key!
If you need to re-install Windows, you will need the product key. Most of the time, the place this exists is on the CD jacket Windows came with, and if for some reason you can't find that, it can be quite inconvenient. You can search the registry for it, but there is a program to make this task much easier. It’s called Magical Jelly Bean Keyfinder.
"The Magical Jelly Bean Keyfinder” is a freeware utility that retrieves your Product Key only (CD key) used to install windows from your registry. It has the options to copy the key to clipboard, save it to a text file, or print it for safekeeping. It works on Windows 95, 98, ME, NT4, 2000, XP, Server 2003, Office 97, and Office XP. This version is a quick update to make it work with Windows Server 2003
Go to www.magicaljellybean.com/keyfinder.shtml for more details.
The utility is freeware.
Back To Top
"The Magical Jelly Bean Keyfinder” is a freeware utility that retrieves your Product Key only (CD key) used to install windows from your registry. It has the options to copy the key to clipboard, save it to a text file, or print it for safekeeping. It works on Windows 95, 98, ME, NT4, 2000, XP, Server 2003, Office 97, and Office XP. This version is a quick update to make it work with Windows Server 2003
Go to www.magicaljellybean.com/keyfinder.shtml for more details.
The utility is freeware.
Back To Top
Tuesday, August 22, 2006
See Who Owns The Sites You Visit - CallingID
Are you sure that the site you are entering is the site you think it is? Maybe it's a "phishing" site trying to get your info. CallingID is a program that will install a toolbar at the top your browser page which indicates the site you are visiting, who really does own it and if it's what it seems to be. CallingID works on both Internet Explorer and Firefox. The good news - it's FREE and free is good! Why not give it a try?
Back to Top
Back to Top
Sunday, August 13, 2006
Are you ready for "Vista"?
Windows Vista, the successor to Windows XP, is still being held back so that Microsoft can do some more "tweaking". I have used the Beta version just to see how it functions and have had very few problems. Others, though, report that they have not had the same experience. Many of the programs you may now have will function with Windows Vista, but some will not, at least not yet. Most devices you may now have will work, although some may require downloading new drivers for proper functionality. Microsoft went so far as to have hackers actually try to break the new system and they were successful. Microsoft is again busy altering the program to plug these weaknesses. The final delivery date is still anybody's guess. It is known that Windows Vista will be available as an upgrade to Windows XP and Windows 2000, all others must do a "clean install". When Windows XP was first released, the upgrade proved to be far more problematic than a "clean install" and this may well be the case with the release of Vista. Only time will tell but I would hold off for some time after the release date until most of the bugs are ironed out. Vista also requires a lot of resources to run in its "full" state with all the fancy graphics, etc. It can, however, be run in a simplified mode without these resource heavy items being used, and still operates in a satisfactory manner.
All that being said, how will you know if your machine will even be able to run Windows Vista? Well, Microsoft can at least give you an idea by examining what you already have and what you will need. They are making available the "Windows Vista Upgrade Advisor Beta". When you download this from Microsoft, you can scan your own computer and get a report of what Vista needs in comparison to what you have and with suggestions on what changes have to be made to run Vista and how to make them."Windows Vista Upgrade Advisor Beta" is available for download by clicking on the title of this posting or on the links above. Have fun!
Back to Top
All that being said, how will you know if your machine will even be able to run Windows Vista? Well, Microsoft can at least give you an idea by examining what you already have and what you will need. They are making available the "Windows Vista Upgrade Advisor Beta". When you download this from Microsoft, you can scan your own computer and get a report of what Vista needs in comparison to what you have and with suggestions on what changes have to be made to run Vista and how to make them."Windows Vista Upgrade Advisor Beta" is available for download by clicking on the title of this posting or on the links above. Have fun!
Back to Top
Thursday, June 01, 2006
"SpellBound" broken?
If you have recently updated your Firefox Browser to Version 1.5.0.3 you will notice that your spell checker program "SpellBound" no longer functions properly. Fortunately, there is a solution. There is a version called "SpellBound Development" that will do the job. It can be found here. Uninstall the version that you have installed at present. Now go to the "Update 2006.01.03" paragraph at the top of the page and double click where it says "Spellbound Development Version"
(Friday, June 2, 2006 - Please note that Firefox (Version 1.5.0.4) has just been released and you should upgrade to this version because of it's security improvements. Also note that the same "SpellBound" situation still exists and the "fix" as outlined above works with Version 1.5.0.4 of Firefox also.)
In addition to the above, you will have to download and install a "Dictionary" in the language of your choice (ie: "English-US"). Dictionaries from Mozilla Development can be found here. Simply download and install the dictionary as you would any other Firefox "extension". Note that the dictionary will be installed into the SpellBound extension and therefore will not appear as an individual extension in your extensions list.
Back to Top
(Friday, June 2, 2006 - Please note that Firefox (Version 1.5.0.4) has just been released and you should upgrade to this version because of it's security improvements. Also note that the same "SpellBound" situation still exists and the "fix" as outlined above works with Version 1.5.0.4 of Firefox also.)
In addition to the above, you will have to download and install a "Dictionary" in the language of your choice (ie: "English-US"). Dictionaries from Mozilla Development can be found here. Simply download and install the dictionary as you would any other Firefox "extension". Note that the dictionary will be installed into the SpellBound extension and therefore will not appear as an individual extension in your extensions list.
Back to Top
Saturday, May 20, 2006
Skip the XP Login Page
Windows security updates are undeniably a good thing, but they can be pesky at times. One typical piece of Windows strangeness is that after a couple of the patches your computer will no longer go straight to the desktop at bootup, but will display the login screen. This can be especially annoying since most machines have only one user account on them anyway. Not to worry, this guide will take you through the few steps it takes to have Windows XP skipping that login screen and booting straight to your desktop.
First, you'll need to click "Start", then "Run" and inside of the run dialogue type "control userpasswords2" The screen shown below should appear.
(userpasswords2.jpg)
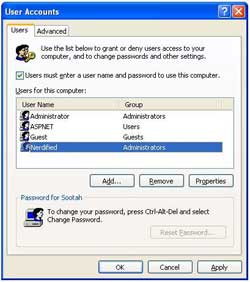
Now, first instinct tells you to uncheck the box that says "Users must enter a user name and password to use this computer" and call it good.
While that is definitely one of the steps, don't do it just yet. You'll want to highlight the default user account first, and then uncheck the box. Windows will autoboot to whatever account is highlighted when you uncheck the box.
Now, after you've unchecked the box, click OK. "Automatically Log On" should be the next dialog box that you see. Don't enter a password and click OK.
That's all! You've told Windows XP what account you want as the default and it will now automatically load that account, and should stay there unless told otherwise. (If you log off, etc) Reboot, and test.
Link: (Thanks to www.crueseinformatique.net for this tip!)
Back to Top
First, you'll need to click "Start", then "Run" and inside of the run dialogue type "control userpasswords2" The screen shown below should appear.
(userpasswords2.jpg)

Now, first instinct tells you to uncheck the box that says "Users must enter a user name and password to use this computer" and call it good.
While that is definitely one of the steps, don't do it just yet. You'll want to highlight the default user account first, and then uncheck the box. Windows will autoboot to whatever account is highlighted when you uncheck the box.
Now, after you've unchecked the box, click OK. "Automatically Log On" should be the next dialog box that you see. Don't enter a password and click OK.
That's all! You've told Windows XP what account you want as the default and it will now automatically load that account, and should stay there unless told otherwise. (If you log off, etc) Reboot, and test.
Link: (Thanks to www.crueseinformatique.net for this tip!)
Back to Top
Wednesday, April 05, 2006
Finding Out Someone's E-Mail Address
If someone sends you an e-mail and all that you see in the 'from' field is their name, open the e-mail message by double clicking on it (in the inbox). Place the pointer over the name in the "From" field and right click. Select "Properties" and their e-mail address will appear.
Back to Top
Back to Top
Friday, March 31, 2006
Boring Logon - Try Logon Studio
I hate with a passion the windows logon screen. It's so dull and boring. Logon Studio is a fast fun and easy way to change the way you log onto your windows machine. With Logon Studio you can customize the look and even the text of your log on screen.
Of course it is FREE (Windows Only)
Download Logon Studio http://www.stardock.com/products/logonstudio/
Download pre-made skins here: http://www.wincustomize.com/Skins.aspx?LibID=26
Back to Top
Of course it is FREE (Windows Only)
Download Logon Studio http://www.stardock.com/products/logonstudio/
Download pre-made skins here: http://www.wincustomize.com/Skins.aspx?LibID=26
Back to Top
Tuesday, March 07, 2006
Want to "Excel"?
If you receive documents compiled using Microsoft Excel but you don't have Excel installed on your computer, you can still read Excel documents. All you need is the "Excel Viewer 2003" from Microsoft which can be downloaded and installed on your computer. Simply click here.
Note that you will not be able to alter the document using the viewer but you will be able to view it. Handy, eh?
Back to Top
Note that you will not be able to alter the document using the viewer but you will be able to view it. Handy, eh?
Back to Top
Thursday, February 16, 2006
Recover Your Autoplay!
Once upon a time, Windows anticipated my every move, popping up a wizard when I plugged in my camera, or launching my media player when I inserted a music CD. Then one day (after I installed a new program, or clicked--without reading carefully--a pop-up dialog box), Windows forgot what to do with my music, photos, and other media files.
Right-clicking the drive or device in Explorer and choosing Properties will lead you to an Autoplay or Events tab where you can reestablish which program should do what when you plug in, but Autoplay settings sometimes remain stubbornly broken.
Microsoft's Autoplay Repair Wizard fixes the botched settings. Although the Microsoft download page asks you to validate your copy of Windows before downloading the wizard (how annoying!), you can, perversely enough, opt out of validation and still download the fix. Now, isn't that better?
Back to Top
Right-clicking the drive or device in Explorer and choosing Properties will lead you to an Autoplay or Events tab where you can reestablish which program should do what when you plug in, but Autoplay settings sometimes remain stubbornly broken.
Microsoft's
Back to Top
Wednesday, February 01, 2006
Surf With Safety!
I recently came across another weapon in the war against spyware that's so useful I can't help myself from telling you about it.
In this era of drive-by installs and unannounced browser hijacks, surfing the Web can seem like tiptoeing across a minefield: one wrong step, and you've got serious problems. For the past couple of years, I have been hoping someone would develop a tool that tests Web sites for potential safety issues, so when I found a Firefox plug-in called SiteAdvisor, I was excited. Even better, once I started testing it this tiny add-on actually exceeded my expectations, which is rare.
The short story on SiteAdvisor is that it gives you the dirt on more than a million Web sites. Its test bots constantly check sites to see whether they send unsolicited e-mail, bury users under a blanket of pop-ups, and--perhaps most importantly--contain software that could compromise your privacy. Whenever you visit a URL, SiteAdvisor's browser icon flashes one of three colors: green (safe), yellow (caution), or red (extreme caution). Then, with a couple clicks, you can head to SiteAdvisor's home page for more detailed information. According to the company, about 90 percent of the sites tested so far have scored a green rating, whereas only 5 percent haved earned the red flag for bad behavior. My favorite part about the plug-in is that it rates sites directly from search engines such as Yahoo and Google, which reduces your chances of falling victim to a drive-by install. By the way, did I say that it's FREE?
(Used with permission from CNET Networks, Inc., Copyright 2006. All rights reserved.)
Addendum: SiteAdvisor is also available for Internet Explorer. You can find it by clicking here: (SiteAdvisor for Internet Explorer)
Back to Top
In this era of drive-by installs and unannounced browser hijacks, surfing the Web can seem like tiptoeing across a minefield: one wrong step, and you've got serious problems. For the past couple of years, I have been hoping someone would develop a tool that tests Web sites for potential safety issues, so when I found a Firefox plug-in called SiteAdvisor, I was excited. Even better, once I started testing it this tiny add-on actually exceeded my expectations, which is rare.
The short story on SiteAdvisor is that it gives you the dirt on more than a million Web sites. Its test bots constantly check sites to see whether they send unsolicited e-mail, bury users under a blanket of pop-ups, and--perhaps most importantly--contain software that could compromise your privacy. Whenever you visit a URL, SiteAdvisor's browser icon flashes one of three colors: green (safe), yellow (caution), or red (extreme caution). Then, with a couple clicks, you can head to SiteAdvisor's home page for more detailed information. According to the company, about 90 percent of the sites tested so far have scored a green rating, whereas only 5 percent haved earned the red flag for bad behavior. My favorite part about the plug-in is that it rates sites directly from search engines such as Yahoo and Google, which reduces your chances of falling victim to a drive-by install. By the way, did I say that it's FREE?
(Used with permission from CNET Networks, Inc., Copyright 2006. All rights reserved.)
Addendum: SiteAdvisor is also available for Internet Explorer. You can find it by clicking here: (SiteAdvisor for Internet Explorer)
Back to Top
Tuesday, January 24, 2006
What Does That EULA Really Say?
End User License Agreements (EULa's) are really the bane of computer owners. Before you can install that software, you have to agree to the darn license agreement. Most EULA's are long, involved and couched in legalese and you could be agreeing to almost anything. Many a spyware program has been downloaded because the EULA was either not read or not understood by a frustrated computer owner. Javacool Software has come through again! I came across this FREE (for personal use) program called EULAlyzer that will skim through those troublesome EULA's looking for suspect words and phrases. Now you can have some idea just what the darn EULA really does say and decide whether you want to agree to it or not.
Back to Top
Back to Top
Monday, January 23, 2006
Can't Find Your Cursor?
Have you ever had trouble locating the cursor on your screen? Whether it’s jammed in a corner or camouflaged in a cloud on your desktop, this shortcut is a clever little feature in Windows XP.
1. Open the Start menu and click "Control Panel".
2. Choose "Printers and other hardware" and click "Mouse".
3. Go to the "Pointer Options" tab and check the box that says "Show location of pointer when I press the CTRL key".
4. Click OK to exit.
Now, if you ever lose your cursor, just tap the Ctrl key to find it again. Isn't that the neatest thing you ever heard?
Back to Top
1. Open the Start menu and click "Control Panel".
2. Choose "Printers and other hardware" and click "Mouse".
3. Go to the "Pointer Options" tab and check the box that says "Show location of pointer when I press the CTRL key".
4. Click OK to exit.
Now, if you ever lose your cursor, just tap the Ctrl key to find it again. Isn't that the neatest thing you ever heard?
Back to Top
Wednesday, January 04, 2006
Bad Time With Spyware? - Try Spyware Blaster
There's lots of troublesome spyware out there just waiting to spy on your every move. Why not handle it with "Spyware Blaster" from Javacool Software. Spyware Blaster is FREE (and free is good). You can get Spyware Blaster by clicking on the title of this posting or by clicking here.
Back to Top
Back to Top
Friday, December 09, 2005
Windows XP - On-screen Keyboard
Here's another XP secret revealed. Windows XP has an on-screen keyboard. You might need this if you can't get to your own keyboard. Here's how you do this: Open "My Computer" and browse to "C:/Windows/ System32" then double-click "osk.exe". You can use the keyboard using simple point and click commands. Handy thing to know, don't you think!
Back to Top
Back to Top
Wednesday, November 30, 2005
Firefox Update, the "Googlebar" & "Spellbound"
For those of you who are using the Firefox browser, be advised that Firefox has been updated to Version 1.5. If you have been using the "Googlebar" extension from Firefox, you will find that it is no longer compatible with this version, so go to "Tools", "Extensions", scroll down to "Googlebar", right click on this item and select "Uninstall". While Firefox has not yet made a compatible "Googlebar" extension for Version 1.5, the good news is that Google has. The version from Google installs right into the Firefox browser and functions correctly. Be sure to read all the installation instructions so you know just what you're getting. The Google version can be found at the link below:
http://toolbar.google.com/firefox/
In addition, you may find that your "SpellBound" spelling checker has stopped functioning. This is because the "dictionary libraries" have not transferred correctly to Firefox Version 1.5. The easiest solution is to uninstall your present "SpellBound" program (go to "Tools", "Extensions", scroll down to "SpellBound", right click on this item and select "Uninstall"). Now, you can re-install "SpellBound" and the "libraries". You can find them both at the link below:
http://spellbound.sourceforge.net/.
Addendum:
If you still have compatibility problems the following program can solve them, but caution should be observed. This program is actually a program developers tool and not for the faint of heart. If you decide to use this, simply download it and install it into your Firefox Extensions just as if it was a regular extension but do nothing else. Just the installation of the program will present you with an option to use the tool to automatically overcome any incompatibilities. Remember, use caution with this program! It can be obtained by utilizing the link below:
http://users.blueprintit.co.uk/~dave/web/firefox/buildid/nightly.html
Back to Top
http://toolbar.google.com/firefox/
In addition, you may find that your "SpellBound" spelling checker has stopped functioning. This is because the "dictionary libraries" have not transferred correctly to Firefox Version 1.5. The easiest solution is to uninstall your present "SpellBound" program (go to "Tools", "Extensions", scroll down to "SpellBound", right click on this item and select "Uninstall"). Now, you can re-install "SpellBound" and the "libraries". You can find them both at the link below:
http://spellbound.sourceforge.net/.
Addendum:
If you still have compatibility problems the following program can solve them, but caution should be observed. This program is actually a program developers tool and not for the faint of heart. If you decide to use this, simply download it and install it into your Firefox Extensions just as if it was a regular extension but do nothing else. Just the installation of the program will present you with an option to use the tool to automatically overcome any incompatibilities. Remember, use caution with this program! It can be obtained by utilizing the link below:
http://users.blueprintit.co.uk/~dave/web/firefox/buildid/nightly.html
Back to Top
Tuesday, November 08, 2005
Turn Off File and Print Sharing!
The file and printer sharing setting in Windows could leave you wide open to invasion from the Internet. So, turn it off, already!
In Windows 98 and ME, click Start, Settings and Control Panel. Then:
--Double click the Network icon
--Select Configuration and click the File and Print Sharing button
--Deselect file sharing and print sharing
--Click OK & OK. Restart the computer.
In Windows XP, double click the Network icon as before. Then:
--Right-click Local Area Connection
--Click Properties and the General tab
--Clear File and Printer Sharing for Microsoft Networks
--Click OK. Close the Network Connections window. Restart the computer.
If you must use file and printer sharing, be sure you have a firewall. I recommend Zone Alarm. If possible, disable file and printer sharing until you need it.
Back to Top
In Windows 98 and ME, click Start, Settings and Control Panel. Then:
--Double click the Network icon
--Select Configuration and click the File and Print Sharing button
--Deselect file sharing and print sharing
--Click OK & OK. Restart the computer.
In Windows XP, double click the Network icon as before. Then:
--Right-click Local Area Connection
--Click Properties and the General tab
--Clear File and Printer Sharing for Microsoft Networks
--Click OK. Close the Network Connections window. Restart the computer.
If you must use file and printer sharing, be sure you have a firewall. I recommend Zone Alarm. If possible, disable file and printer sharing until you need it.
Back to Top
Tuesday, October 18, 2005
Maintain Perfect Time!
Don't be surprised if you occasionally end up late for a meeting when you rely on your PC's clock. Most computers do a poor job of keeping time, losing as much as a couple of seconds a day. That may not seem like a big deal, but let it go on for a few months and it's more than enough to put your PC's clock several minutes on the slow side.
Windows XP users can solve this problem easily. Simply right-click the clock in the corner of the taskbar, click Adjust Date/Time, select the Internet Time tab, and check the Automatically synchronize with an Internet time server box. When your computer connects to the Net, it will periodically check in with an atomic clock and make sure that you have the correct time.
Thanks to PC World!(link)Back to Top
Friday, October 14, 2005
Firewall Protection?
Anytime you're connected to the Internet your PC is exposed to the whole world. If it is not protected properly, crackers can detect the PC, probe it for vulnerabilities, exploit them to gain access to your machine and either openly wreak havoc by stealing and/or deleting data, or secretly plant malicious code that turns your PC into a zombie to be part of an attack on somebody's server or network. This issue is especially important for PCs with a highspeed connection to the Internet via DSL or cable modems because they are prime targets for crackers.
To find out how vulnerable your machine is, visit this excellent web site that offers some online tools to test your machine's security. Open your browser, go to http://grc.com/default.htm and click on "Shield's UP!". Read the information on this page, then click "Test My Shields!" and "Probe My Ports!". These tests check for obvious vulnerabilities of your PC and you might be surprised at the results. Chances are you have a number of open and/or visible ports that can make your machine a target for crackers.
You can protect your machine by closing these security holes with the help of a program called a firewall. Firewall software monitors your Internet connection and filters all traffic to keep undesired traffic out and only allows legitimate traffic through. There are a number of software firewalls available on the Internet and in stores. The one we recommend is ZoneLab's Zone Alarm. You can download a free version (for personal use) from ZoneLab's web site at http:///www.zonelabs.com. Note that you should only have one firewall program installed and operational at a time to avoid conflicts between them.
After installing Zone Alarm, go back and perform another Shields UP! Test and Port Probe. You should see a big difference and find that all tested ports are now closed and in stealth mode.
Since Steve Gibson did an excellent job at explaining firewalls, the tests, and the dangers, and the topic is beyond the scope of this article, we'll refrain from going more into detail at this point, but you are encouraged to read more about this fascinating topic at http://grc.com/su-explain.htm.
Back to Top
To find out how vulnerable your machine is, visit this excellent web site that offers some online tools to test your machine's security. Open your browser, go to http://grc.com/default.htm and click on "Shield's UP!". Read the information on this page, then click "Test My Shields!" and "Probe My Ports!". These tests check for obvious vulnerabilities of your PC and you might be surprised at the results. Chances are you have a number of open and/or visible ports that can make your machine a target for crackers.
You can protect your machine by closing these security holes with the help of a program called a firewall. Firewall software monitors your Internet connection and filters all traffic to keep undesired traffic out and only allows legitimate traffic through. There are a number of software firewalls available on the Internet and in stores. The one we recommend is ZoneLab's Zone Alarm. You can download a free version (for personal use) from ZoneLab's web site at http:///www.zonelabs.com. Note that you should only have one firewall program installed and operational at a time to avoid conflicts between them.
After installing Zone Alarm, go back and perform another Shields UP! Test and Port Probe. You should see a big difference and find that all tested ports are now closed and in stealth mode.
Since Steve Gibson did an excellent job at explaining firewalls, the tests, and the dangers, and the topic is beyond the scope of this article, we'll refrain from going more into detail at this point, but you are encouraged to read more about this fascinating topic at http://grc.com/su-explain.htm.
Back to Top
Wednesday, September 28, 2005
WinMX failure?
For those of you who may be using "WinMX" to download music, you may have noticed that this program ceased to function a few days ago when the WinMX servers were changed due to an RIAA regulation. This means that the program, as you currently have it, cannot connect to music sources. There are two possible solutions: 1 - Uninstall WinMX and use another program OR 2 - click on the link below and download and install the "fix" (be sure to use the "fix" that matches your operating system (windows 98, Windows ME. Windows XP, etc.). You may have to reboot for the installed fix to take effect but you will find that WinMX works again perfectly.
http://www.winmxunlimited.net/Peer-Cache-Patch-1.1.exe
An alternative patch for WinMx is available here if the first one won't work for you:
http://winmxgroup.com/
Back to Top
http://www.winmxunlimited.net/Peer-Cache-Patch-1.1.exe
An alternative patch for WinMx is available here if the first one won't work for you:
http://winmxgroup.com/
Back to Top
Thursday, September 22, 2005
Security Tip: Use a Blank Password
Here's a little-known fact: In Windows XP, it is often more secure
to use a blank password than to make up a password. When an account
has a blank password, you can log on locally but not through the
network. This prevents anyone from using that account to break into
the computer remotely via the local network or the Internet. This
Microsoft article explains more and has many other security tips:
http://microsoft.com/technet/archive/security/chklist/xpcl.mspx
Back to Top
to use a blank password than to make up a password. When an account
has a blank password, you can log on locally but not through the
network. This prevents anyone from using that account to break into
the computer remotely via the local network or the Internet. This
Microsoft article explains more and has many other security tips:
http://microsoft.com/technet/archive/security/chklist/xpcl.mspx
Back to Top
Wednesday, September 21, 2005
Is Your Cookie Jar Full?
Checked your Cookie folder lately? OK, so you delete your Temp and Temporary Internet files on a regular basis. You do, don't you? I recommend that you do!!
Among the reasons your Browser and even your 'puter may have slowed down is that you have been accumulating Temp files, Temporary Internet files and Cookies.
Yes, Virginia, there is a "Cookie Monster". But he's not stealing cookies.....he's passing them out as quickly as he can to whomever he can easily pass them off on!!!
I was probably as guilty as anyone about cleaning out Cookies until...... One day I went in to dump the "Cookie Jar" and started looking at some of them. Hundreds of them, no, thousands of them. Where did they all come from? I could have opened a national bakery if they were edible.
Well, I decided to find out just where they were all coming from. I use Internet Explorer 6 and there is a Cookie manager in "Tools"/"Internet Options" that will allow you to manage the Cookie activity. Here is how to set it up.
First you need IE6 and OE6 to use the options. Go to the "Tools" menu and select "Internet Options". Click on the Privacy Tab. Now click on the "Advanced..." button. Make sure the "Override automatic cookie handling" box is checked.
You have some options here. I decided after a week to" Accept First-party (named and verified) Cookies", but kept, and still use, "Prompt for Third-party Cookies". You will go nuts if you ask for a prompt on both. However you might want to try the Prompt on First-party for a few days just to see where they come from.
When you have your choices made, click OK to close the dialog box and then click Apply, OK to close the Internet Options box. Now you are set to be overwhelmed. This will also alert you to Cookies that come in your e-mail. WHAT? Cookies in my e-mail? Yup, it will blow you away. More on this in a minute.
So what kind of Cookies are there? Chocolate chip? Raisin? I call them Good Cookies, Bad Cookies and Rotten Cookies. But like I said you get them in e-mail as well as from site visits. Any of these Cookies can be placed on your 'puter through your Browser or through your e-mail.
Good Cookies: These remember that you have been to a site and help it load faster. Also, it may keep the site from giving you redundant information.
Bad Cookies: These aren't all really that bad but some can be very undesirable. These can do a number of things like: Track who you are by your IP (internet provider) address. Obtain information by the site owner so they can decide how to hit you with pop-up windows. Find out how many times you have been to their site, what time of day and what pages you visited. There are a number of other things as well.
Rotten Cookies: This is bad news. besides tracking all the above, they can let a hacker come back and infiltrate your hard drive obtaining vital information like passwords, credit card information and other sensitive data. They can also infect you with a virus, collect e-mail addresses from your address books and literally do major damage to your system.
So if your Browser has the ability to let you monitor the Cookies you are getting in your Cookie Jar, use it. With the Prompt option you can accept or refuse Cookies by your choice in both your Browser and e-mail.
Back to Top
Among the reasons your Browser and even your 'puter may have slowed down is that you have been accumulating Temp files, Temporary Internet files and Cookies.
Yes, Virginia, there is a "Cookie Monster". But he's not stealing cookies.....he's passing them out as quickly as he can to whomever he can easily pass them off on!!!
I was probably as guilty as anyone about cleaning out Cookies until...... One day I went in to dump the "Cookie Jar" and started looking at some of them. Hundreds of them, no, thousands of them. Where did they all come from? I could have opened a national bakery if they were edible.
Well, I decided to find out just where they were all coming from. I use Internet Explorer 6 and there is a Cookie manager in "Tools"/"Internet Options" that will allow you to manage the Cookie activity. Here is how to set it up.
First you need IE6 and OE6 to use the options. Go to the "Tools" menu and select "Internet Options". Click on the Privacy Tab. Now click on the "Advanced..." button. Make sure the "Override automatic cookie handling" box is checked.
You have some options here. I decided after a week to" Accept First-party (named and verified) Cookies", but kept, and still use, "Prompt for Third-party Cookies". You will go nuts if you ask for a prompt on both. However you might want to try the Prompt on First-party for a few days just to see where they come from.
When you have your choices made, click OK to close the dialog box and then click Apply, OK to close the Internet Options box. Now you are set to be overwhelmed. This will also alert you to Cookies that come in your e-mail. WHAT? Cookies in my e-mail? Yup, it will blow you away. More on this in a minute.
So what kind of Cookies are there? Chocolate chip? Raisin? I call them Good Cookies, Bad Cookies and Rotten Cookies. But like I said you get them in e-mail as well as from site visits. Any of these Cookies can be placed on your 'puter through your Browser or through your e-mail.
Good Cookies: These remember that you have been to a site and help it load faster. Also, it may keep the site from giving you redundant information.
Bad Cookies: These aren't all really that bad but some can be very undesirable. These can do a number of things like: Track who you are by your IP (internet provider) address. Obtain information by the site owner so they can decide how to hit you with pop-up windows. Find out how many times you have been to their site, what time of day and what pages you visited. There are a number of other things as well.
Rotten Cookies: This is bad news. besides tracking all the above, they can let a hacker come back and infiltrate your hard drive obtaining vital information like passwords, credit card information and other sensitive data. They can also infect you with a virus, collect e-mail addresses from your address books and literally do major damage to your system.
So if your Browser has the ability to let you monitor the Cookies you are getting in your Cookie Jar, use it. With the Prompt option you can accept or refuse Cookies by your choice in both your Browser and e-mail.
Back to Top
Thursday, August 18, 2005
Handy Keyboard Tips!
a) Copy and Paste
Select the text or image that you want to copy, highlight it and press Ctrl and C. Then position your cursor in the spot you’d like to copy it to and press Ctrl and V. Like magic...it copies!
b) Cut and Paste
Select the text or image that you want to cut, highlight it and press Ctrl and X. The text or object will disappear. Then to paste it in a different location, position your cursor in the desired spot and press Ctrl and V.
c) Select All
Holding down Ctrl and A selects all the text or objects in the open window. This is a great feature---use it when you are trying to copy large areas of text in your word processing document, or a whole page of information on the Internet.
d) Increase/Decrease Font Size
Here’s a little trick to help you emphasize your words, or make them fit better into the space you have. Just highlight the words you want to change, hold down the Ctrl key and press one of the bracket keys---left bracket to shrink--right bracket to enlarge. You change the font size by one point each time.
e) To Print
Sure, you can use the pull down menus if you want to print an e-mail, a word processing document or even a an Internet page. But, here’s an easier way. Just hold down the Ctrl key and press P.
f) To Save
It’s always important to save your work often. You never know when you might have a power surge or outage that could ruin hours of effort. That’s why this keyboard shortcut is especially helpful. To save your document, simply press Ctrl and S every five minutes or so while you type.
g) To Undo
Pencils aren’t the only writing instruments with erasers. Computers have them too. If you would like to undo some typing, press Ctrl and Z as soon as you realize your mistake to restore your document to the way you want it.
h) To Use Mouse
You may at some point experience problems with a
program or Windows that disables your ability to use
your mouse. This usually calls for restarting your
computer, but you'll want to save your work and shut
down any applications you're using first. You can do
this without a mouse.
To select an open application, use Alt + Tab. A small
box will pop up showing icons for all your running
applications. You can choose any of them by continuing
to hold down your Alt button while pressing Tab until
you reach the program you want. When you release the
buttons, that application window will come up.
To save your work, press Alt by itself. You should
notice that the 'File' menu, usually in the program's
upper left corner, will be selected. Use your up and
down arrows (not your Page Up & Page Down buttons) to
choose 'Save' or 'Save As' and press your Enter button.
You can then close the program by pressing Alt again
and using your arrows to select 'Exit', 'Quit' or
'Close'.
Once all the applications are closed, pressing Tab will
select your Start menu at the lower left corner of your
screen. Press your Enter button to open the menu, then
use your arrows to choose 'Shut Down'. You'll see the
familiar Shut Down window. Use your arrows to make your
selection, then press Enter.
There may be times when you're unable to use your
mouse, but want to run a virus scan, ScanDisk or
defragment your hard drive before shutting down. Once
again, save your work, close your programs, press Tab
to select the Start menu, press Enter and use your
arrows to choose the application you want to run.
i) Other Common And Useful Keyboard Shortcuts
CTRL + P to print a document, CTRL + F to bring up a Find window (if the program uses one), CTRL + A to select all
(highlight all), CTRL + O to choose a file to open and
CTRL + Z to undo your most recent action.
j) Typing URLs
If the site you want starts with "www" and ends with "com", just type in the part between the two and use CTRL + Enter. Here's an example: You want to visit Knowledge Hound (of course
you do!). Just type in "khound", then press CTRL + Enter. See? The "www" and "com" parts got added
automatically! It sure saves those fingers.
Back to Top
Select the text or image that you want to copy, highlight it and press Ctrl and C. Then position your cursor in the spot you’d like to copy it to and press Ctrl and V. Like magic...it copies!
b) Cut and Paste
Select the text or image that you want to cut, highlight it and press Ctrl and X. The text or object will disappear. Then to paste it in a different location, position your cursor in the desired spot and press Ctrl and V.
c) Select All
Holding down Ctrl and A selects all the text or objects in the open window. This is a great feature---use it when you are trying to copy large areas of text in your word processing document, or a whole page of information on the Internet.
d) Increase/Decrease Font Size
Here’s a little trick to help you emphasize your words, or make them fit better into the space you have. Just highlight the words you want to change, hold down the Ctrl key and press one of the bracket keys---left bracket to shrink--right bracket to enlarge. You change the font size by one point each time.
e) To Print
Sure, you can use the pull down menus if you want to print an e-mail, a word processing document or even a an Internet page. But, here’s an easier way. Just hold down the Ctrl key and press P.
f) To Save
It’s always important to save your work often. You never know when you might have a power surge or outage that could ruin hours of effort. That’s why this keyboard shortcut is especially helpful. To save your document, simply press Ctrl and S every five minutes or so while you type.
g) To Undo
Pencils aren’t the only writing instruments with erasers. Computers have them too. If you would like to undo some typing, press Ctrl and Z as soon as you realize your mistake to restore your document to the way you want it.
h) To Use Mouse
You may at some point experience problems with a
program or Windows that disables your ability to use
your mouse. This usually calls for restarting your
computer, but you'll want to save your work and shut
down any applications you're using first. You can do
this without a mouse.
To select an open application, use Alt + Tab. A small
box will pop up showing icons for all your running
applications. You can choose any of them by continuing
to hold down your Alt button while pressing Tab until
you reach the program you want. When you release the
buttons, that application window will come up.
To save your work, press Alt by itself. You should
notice that the 'File' menu, usually in the program's
upper left corner, will be selected. Use your up and
down arrows (not your Page Up & Page Down buttons) to
choose 'Save' or 'Save As' and press your Enter button.
You can then close the program by pressing Alt again
and using your arrows to select 'Exit', 'Quit' or
'Close'.
Once all the applications are closed, pressing Tab will
select your Start menu at the lower left corner of your
screen. Press your Enter button to open the menu, then
use your arrows to choose 'Shut Down'. You'll see the
familiar Shut Down window. Use your arrows to make your
selection, then press Enter.
There may be times when you're unable to use your
mouse, but want to run a virus scan, ScanDisk or
defragment your hard drive before shutting down. Once
again, save your work, close your programs, press Tab
to select the Start menu, press Enter and use your
arrows to choose the application you want to run.
i) Other Common And Useful Keyboard Shortcuts
CTRL + P to print a document, CTRL + F to bring up a Find window (if the program uses one), CTRL + A to select all
(highlight all), CTRL + O to choose a file to open and
CTRL + Z to undo your most recent action.
j) Typing URLs
If the site you want starts with "www" and ends with "com", just type in the part between the two and use CTRL + Enter. Here's an example: You want to visit Knowledge Hound (of course
you do!). Just type in "khound", then press CTRL + Enter. See? The "www" and "com" parts got added
automatically! It sure saves those fingers.
Back to Top
Wednesday, July 20, 2005
Make a START UP disk and do a REGISTRY backup !
Here are two important steps to take to help out in a computer emergency, that is, if your computer won‘t start with Windows. If your computer fails to start in Windows, power it off. then insert the StartUp disk in your floppy drive and restart your computer.
Here's what you do to make START UP disk and do a REGISTRY backup.
a:To make the Start Up disk:
From the "Start" menu, select "Settings/Control Panel".
Click on "Add/Remove programs" icon.
Next, click on the "StartUp disk" Tab, and select "Create disk".
(You will need a formatted floppy for this)
Follow the on-screen directions to complete the process.
Store this disk in a safe place where you can get the disk, when you need it.
(The Registry maintains all the vital system information and changes made to your computer, such as software installed and system settings).
b:To back up the Registry, use the built-in Registry Editor.
Click on "Start", select "Run" and type: "regedit" (without the quotation marks) and then click "OK".
Next, select "Registry" on the top row of menu items. On the drop-down menu, select "Export Registry File".
Now navigate to where you want to store the backup file. Select "ALL" under export range and click "Save".
The result is a ".reg" file in the location you specified.
I hope you never need either of these, but they're sure handy to have if you do!
Back to Top
Here's what you do to make START UP disk and do a REGISTRY backup.
a:To make the Start Up disk:
From the "Start" menu, select "Settings/Control Panel".
Click on "Add/Remove programs" icon.
Next, click on the "StartUp disk" Tab, and select "Create disk".
(You will need a formatted floppy for this)
Follow the on-screen directions to complete the process.
Store this disk in a safe place where you can get the disk, when you need it.
(The Registry maintains all the vital system information and changes made to your computer, such as software installed and system settings).
b:To back up the Registry, use the built-in Registry Editor.
Click on "Start", select "Run" and type: "regedit" (without the quotation marks) and then click "OK".
Next, select "Registry" on the top row of menu items. On the drop-down menu, select "Export Registry File".
Now navigate to where you want to store the backup file. Select "ALL" under export range and click "Save".
The result is a ".reg" file in the location you specified.
I hope you never need either of these, but they're sure handy to have if you do!
Back to Top
Saturday, July 02, 2005
View Outlook Express E-mail Safely!!!
To be able to safely check your e-mail messages in Outlook Express before opening a messages, here's what you do....
a) Right-click on an unopened e-mail
b) Select "Properties" then click the "Details" tab
c) Now select "Message Source" to read an e-mail in a safe manner.
This allows you to decide if the e-mail was spam, carried a nasty payload, or was a complete waste of time. You can then delete it safely. Handy to know, don't you think?
Back to Top
a) Right-click on an unopened e-mail
b) Select "Properties" then click the "Details" tab
c) Now select "Message Source" to read an e-mail in a safe manner.
This allows you to decide if the e-mail was spam, carried a nasty payload, or was a complete waste of time. You can then delete it safely. Handy to know, don't you think?
Back to Top
Wednesday, June 08, 2005
Adding Animated Icons to E-mail
1. First you, need to build up a file of animated GIFs then:
a) copy/paste this address in your browser address window: www.gifs.net/animate/giflist.htm OR click on the title line of this posting
b) browse through this site, select a GIF that you might want to add to your file.
c) right-click the animation and on the drop-down menu, select "Save Picture as"
d) in next screen select "Desktop" as the place to save it, and then hit "Save"
e) repeat these steps for as many icons you want or need (this can be repeated at a later date to acquire more)
f) close the animated GIF window
g) right-click on an empty space on your desktop. On the drop-down menu, select "New", then select "Folder"
h) right-click "New Folder" and select "Rename" from drop-down menu. Name the folder "Animated GIFs" or whatever you wish.
i) drag each animated gif icon from your desktop to this new folder, giving you a folder-full of animated gifs.
2. To add An animated icon (or more than one) to a new E-Mail
a) write your new e-mail message
b) minimize the message
c) hit the WinKey and D key at the same time, which will bring up your Desktop
d) open your "Animated GIFs" folder
e) select an icon and left-click it
f) when the animated gif appears on your desktop, right-click it and select "Copy" from the drop-down menu
g) close this window and then maximize your e-mail that was minimized on your taskbar
h) place the mouse cursor at a place in message, then hit the "Ctrl" and "V" key.
i) this will insert the animated gif in your message.
Now you can have the most distinctive E-mail in town!
Back to Top
a) copy/paste this address in your browser address window: www.gifs.net/animate/giflist.htm OR click on the title line of this posting
b) browse through this site, select a GIF that you might want to add to your file.
c) right-click the animation and on the drop-down menu, select "Save Picture as"
d) in next screen select "Desktop" as the place to save it, and then hit "Save"
e) repeat these steps for as many icons you want or need (this can be repeated at a later date to acquire more)
f) close the animated GIF window
g) right-click on an empty space on your desktop. On the drop-down menu, select "New", then select "Folder"
h) right-click "New Folder" and select "Rename" from drop-down menu. Name the folder "Animated GIFs" or whatever you wish.
i) drag each animated gif icon from your desktop to this new folder, giving you a folder-full of animated gifs.
2. To add An animated icon (or more than one) to a new E-Mail
a) write your new e-mail message
b) minimize the message
c) hit the WinKey and D key at the same time, which will bring up your Desktop
d) open your "Animated GIFs" folder
e) select an icon and left-click it
f) when the animated gif appears on your desktop, right-click it and select "Copy" from the drop-down menu
g) close this window and then maximize your e-mail that was minimized on your taskbar
h) place the mouse cursor at a place in message, then hit the "Ctrl" and "V" key.
i) this will insert the animated gif in your message.
Now you can have the most distinctive E-mail in town!
Back to Top
Friday, May 20, 2005
I've Been "Setup" Again!
When I download a program or an upgrade, the last thing I want the file named is "setup.exe" or "install". Because I don't always install the program right away, I may lose track of it. Worse, other downloads invariably have the same name, making it even harder to figure out which is which. What a pain!
Here's the solution: Simply right click and rename the file in the "Save As" dialog box before downloading it, using the program's name and version. Now why didn't I think of that?
Thanks to PC World!(link)
Back to Top
Here's the solution: Simply right click and rename the file in the "Save As" dialog box before downloading it, using the program's name and version. Now why didn't I think of that?
Thanks to PC World!(link)
Back to Top
Thursday, May 05, 2005
"Urban Legends" Spam?
If someone sends me a stupid "forward this to all your friends" urban-legend e-mail, I look it up on About.com's Urban Legends and Folklore page and then send them the link. It's amazing what people will believe just because it comes in a nicely typed e-mail. I guess I've embarrassed enough people that they don't send those messages to me anymore, but I still get lots of other spam. Anyway, now you know how to check it out for yourself. Have fun!
Back to Top
Back to Top
Sunday, April 24, 2005
XP SP2 & PowerPoint Viewer problems?
If you have Windows XP Service Pack 2 installed and are having a problem viewing .PPT and .PPS presentations with PowerPoint Viewer 2003, there are two solutions:
1: Save the .PPT or .PPS files as attachments and they can be viewed using the PowerPoint Viewer as it is presently installed, OR
2: Download the "Fix" by clicking on the link found in the title of this posting.
The problem arises because Windows XP Service Pack 2 as it currently exists and Windows PowerPoint Viewer 2003 (BOTH Microsoft products) are not totally compatible with one another. Hmm! How could Microsoft do a dumb thing like that? 'Nuff said, I think.
Back to Top
1: Save the .PPT or .PPS files as attachments and they can be viewed using the PowerPoint Viewer as it is presently installed, OR
2: Download the "Fix" by clicking on the link found in the title of this posting.
The problem arises because Windows XP Service Pack 2 as it currently exists and Windows PowerPoint Viewer 2003 (BOTH Microsoft products) are not totally compatible with one another. Hmm! How could Microsoft do a dumb thing like that? 'Nuff said, I think.
Back to Top
Monday, April 18, 2005
Dumb Windows XP Menus!
My Problem:
First Windows XP hides infrequently used icons in the system tray, then it adds program shortcuts to my Start menu's left pane. Enough!
My Solution:
Take charge of your system tray icons: Right-click the "Start" button and choose "Properties", select the "Taskbar" tab, and uncheck "Hide inactive icons". Or you can decide for yourself which system tray icons you want to see and which you want out of the way by doing the following: leave "Hide inactive icons" checked, click "Customize", and then choose each icon one at a time and set its behavior to "Always show", "Always hide", or "Hide when inactive". If you don't want XP to add items to its Start menu list of frequently used programs, reopen your "Taskbar and Start Menu Properties" dialog box, choose the "Start Menu" tab, click "Customize", and set "Number of programs on Start menu" to a figure of your choosing. Problem solved!
Thanks to PC World!(link)
Back to Top
First Windows XP hides infrequently used icons in the system tray, then it adds program shortcuts to my Start menu's left pane. Enough!
My Solution:
Take charge of your system tray icons: Right-click the "Start" button and choose "Properties", select the "Taskbar" tab, and uncheck "Hide inactive icons". Or you can decide for yourself which system tray icons you want to see and which you want out of the way by doing the following: leave "Hide inactive icons" checked, click "Customize", and then choose each icon one at a time and set its behavior to "Always show", "Always hide", or "Hide when inactive". If you don't want XP to add items to its Start menu list of frequently used programs, reopen your "Taskbar and Start Menu Properties" dialog box, choose the "Start Menu" tab, click "Customize", and set "Number of programs on Start menu" to a figure of your choosing. Problem solved!
Thanks to PC World!(link)
Back to Top
Saturday, April 09, 2005
Repair Scratched Disc? Maybe...
You might not have to buy a commercial cleaner if your CD disc is only slightly scratched. Sometimes you can get pretty good results with any mildly abrasive agent such as furniture polish or baking soda toothpaste. Just use any lint-free cloth, add some of the abrasive to the damaged area, and then wipe. Be sure to work radially, from the center of the disc to the rim in a straight line. Never wipe in a circular pattern! That's a definite no-no!!
This technique does nothing for the deeper blemishes, though. For that, some folks have recommended applying a carnauba-based car wax. I tried Turtle Wax, and several other similar products, and elbow grease but got nothing except a really shiny CD that still wouldn't play and which is now a coffee-table coaster for my cup.
Back to Top
This technique does nothing for the deeper blemishes, though. For that, some folks have recommended applying a carnauba-based car wax. I tried Turtle Wax, and several other similar products, and elbow grease but got nothing except a really shiny CD that still wouldn't play and which is now a coffee-table coaster for my cup.
Back to Top
Sunday, April 03, 2005
Handy Quick Way to Shutdown or Restart!
Shut down your computer in 1 second (well..umm don't time it)
(most current Windows versions)
Press the Windows key and then release the key, and then press the "U" key twice. Windows will automatically shut down (or re-start, if you prefer).
Back to Top
(most current Windows versions)
Press the Windows key and then release the key, and then press the "U" key twice. Windows will automatically shut down (or re-start, if you prefer).
Back to Top
Wednesday, March 30, 2005
VOIP (Voice Over Internet)
I am currently trying out a telephone service that uses the internet rather than the traditional telephone companies. The name of the new supplier is Vonage and it is available online at vonage.ca. Just click on the title of this posting and a live link will take you to their website. The service is now up and running and, after a few missteps in the installation procedure, it now seems, so far at least, to work as advertised. The voice quality is as good or better than what you are used to from a telephone company. In addition, it comes with all sorts of features (call display,call forwarding, voicemail which can be emailed to you) and a whole host of other "included with the program" extras and all this, in my case at least, for about half what I have been paying my old telephone service provider. Only time will tell, of course, whether this turns out all it's been cracked up to be but I do note that Vonage claims to have about 500,00 customers so they must be doing something right. This not a recommendation of any type, just an information posting. Check it out and see if it's the kind of thing you might be interested in. I will do a follow up posting on this after I have had and used the program for a while.
May 1, 2005 - Follow Up!
I have now had and used the Vonage broadband telephone service for a month and, even with a few small problems, I am quite pleased. The service has been good and the sound quality excellent. On the downside, I have discovered that telephone numbers using the #310 prefix, mostly fast food ordering numbers, cannot be reached by either broadband telephone and/or some cellphones. This is because the #310 numbers are used exclusively by "landline" telephone service providers who make no provision for the connection of services other than their own. Vonage.ca assures me that they are working to find a way around this slight bottleneck. In the interim, both broadband and some cellphone users must locate and dial the "regular" numbers with area code, etc. which were in use before fastfood companies began their alternative dialing system for use in some localities. I must reiterate that the #310 dialing sequence is not in effect in all locations, and so this is a problem only in specialized areas.
Other than the item mentioned above, I have been satisfied with the telephone service, the quick customer service response, and the ability to review your calls and billing on a daily basis to keep track of costs. We have opted to pay automatically by credit card, and Vonage sends a confirming email on the payment date that this has been accomplished and for which amount. All the "included" features that one would pay extra for with a regular telephone service provider more than make up for the small problem noted above. We have tested the 911 service and, while the emergency services people cannot automatically tell who is calling (another feature Vonage is working on), 911 calls do reach the local emergency services office, in our case the local RCMP, who were not surprised by the lack of a viewable caller ID on their equipment. So no real problem exists, unless one was unable for some reason to give them an address or describe a problem. So far, not a perfect solution as the same problem occurs with cellphone emergency calls, but certainly a step in the right direction.
All that being said, we have decided that we will keep Vonage as our broadband telephone service provider for all the positive reasons noted above. Terry
Back to Top
May 1, 2005 - Follow Up!
I have now had and used the Vonage broadband telephone service for a month and, even with a few small problems, I am quite pleased. The service has been good and the sound quality excellent. On the downside, I have discovered that telephone numbers using the #310 prefix, mostly fast food ordering numbers, cannot be reached by either broadband telephone and/or some cellphones. This is because the #310 numbers are used exclusively by "landline" telephone service providers who make no provision for the connection of services other than their own. Vonage.ca assures me that they are working to find a way around this slight bottleneck. In the interim, both broadband and some cellphone users must locate and dial the "regular" numbers with area code, etc. which were in use before fastfood companies began their alternative dialing system for use in some localities. I must reiterate that the #310 dialing sequence is not in effect in all locations, and so this is a problem only in specialized areas.
Other than the item mentioned above, I have been satisfied with the telephone service, the quick customer service response, and the ability to review your calls and billing on a daily basis to keep track of costs. We have opted to pay automatically by credit card, and Vonage sends a confirming email on the payment date that this has been accomplished and for which amount. All the "included" features that one would pay extra for with a regular telephone service provider more than make up for the small problem noted above. We have tested the 911 service and, while the emergency services people cannot automatically tell who is calling (another feature Vonage is working on), 911 calls do reach the local emergency services office, in our case the local RCMP, who were not surprised by the lack of a viewable caller ID on their equipment. So no real problem exists, unless one was unable for some reason to give them an address or describe a problem. So far, not a perfect solution as the same problem occurs with cellphone emergency calls, but certainly a step in the right direction.
All that being said, we have decided that we will keep Vonage as our broadband telephone service provider for all the positive reasons noted above. Terry
Back to Top
Tuesday, March 22, 2005
Lost DSL/Cable Connections
The Annoyance:
I spend a couple of frustrating hours trying to figure out why my DSL connection can't access the Internet. I check my connection with utility programs, reconfigure my pop-up and ad blocker, fiddle with Windows' TCP/IP settings, and call tech support--still nothing.
The Fix:
A simple, 2-minute reboot of your DSL or cable modem may be all it takes to get you back online. The mystery is why there isn't a diagnostic tool that can tell you it's time to reset your Internet access device. Frustrating, yes, but don't get so annoyed you forget to do it.
Thanks to PC World!(link)
Back to Top
I spend a couple of frustrating hours trying to figure out why my DSL connection can't access the Internet. I check my connection with utility programs, reconfigure my pop-up and ad blocker, fiddle with Windows' TCP/IP settings, and call tech support--still nothing.
The Fix:
A simple, 2-minute reboot of your DSL or cable modem may be all it takes to get you back online. The mystery is why there isn't a diagnostic tool that can tell you it's time to reset your Internet access device. Frustrating, yes, but don't get so annoyed you forget to do it.
Thanks to PC World!(link)
Back to Top
Wednesday, March 16, 2005
Vanishing Web Data?
The Annoyance:
I spend an hour filling in a lengthy form on a Web page only to be told after I submit it that it's missing an item. My fault, sure, but when I hit my browser's back button--zap!--everything's gone. Now I have to start from scratch. Aggravating? You bet.
The Fix:
Instead of growling, fix your browser's cache settings to hold on to the information. In Internet Explorer, click "Tools", "Internet Options", select the "General" tab, choose "Settings", and then check "Every time you start Internet Explorer". In Netscape, click "Edit", "Preferences", double-click "Advanced", and click "Cache". In Firefox, it's "Tools", then "Options", and finally "Privacy".(Note that Firefox has only one adjustable cache setting.) For the others: set the memory cache to at least 1024KB, and the disk cache to a minimum of 7680KB. Then clear both caches. Note that you may have to click your browser's refresh button to see a revisited page's dynamic data.
Thanks to PC World!(link)
Back to Top
I spend an hour filling in a lengthy form on a Web page only to be told after I submit it that it's missing an item. My fault, sure, but when I hit my browser's back button--zap!--everything's gone. Now I have to start from scratch. Aggravating? You bet.
The Fix:
Instead of growling, fix your browser's cache settings to hold on to the information. In Internet Explorer, click "Tools", "Internet Options", select the "General" tab, choose "Settings", and then check "Every time you start Internet Explorer". In Netscape, click "Edit", "Preferences", double-click "Advanced", and click "Cache". In Firefox, it's "Tools", then "Options", and finally "Privacy".(Note that Firefox has only one adjustable cache setting.) For the others: set the memory cache to at least 1024KB, and the disk cache to a minimum of 7680KB. Then clear both caches. Note that you may have to click your browser's refresh button to see a revisited page's dynamic data.
Thanks to PC World!(link)
Back to Top
Tuesday, March 08, 2005
Shortcut to your favorite Favorites?
If you have several often-visited Favorite sites, here's a quick way to access these:
When you have a favorite site on screen, notice the address shown and to the left of the address you will notice an icon. Put your mouse cursor on this icon and hold down the left mouse button. Then drag the icon to the task bar and position it near the Start button or a little bit to right of it. Then release the button and a small pop-up menu appears. Click on "move here" and that will do it. You will have the short-cut icon on your task bar for easier access. You can do this with several of your favorite Favorites. At some point you may have too many on your task bar, so you will see a >> symbol. Put your mouse cursor on the >> and left-click it. You will then get a pop-up menu and you can select your favorite link. You can remove these shortcut icons from the task bar by simply right clicking and selecting delete. Simple, yes???
Back to Top
When you have a favorite site on screen, notice the address shown and to the left of the address you will notice an icon. Put your mouse cursor on this icon and hold down the left mouse button. Then drag the icon to the task bar and position it near the Start button or a little bit to right of it. Then release the button and a small pop-up menu appears. Click on "move here" and that will do it. You will have the short-cut icon on your task bar for easier access. You can do this with several of your favorite Favorites. At some point you may have too many on your task bar, so you will see a >> symbol. Put your mouse cursor on the >> and left-click it. You will then get a pop-up menu and you can select your favorite link. You can remove these shortcut icons from the task bar by simply right clicking and selecting delete. Simple, yes???
Back to Top
Wednesday, March 02, 2005
Internet Explorer Tips!
In some applications (such as Internet Explorer), holding the "Control" key while turning the mouse wheel will change the font size.
In Internet Explorer, hold the "Shift" key while turning the mouse wheel to go forwards or backwards.
In Internet Explorer, hold the "Shift" key while clicking on a link to open the Web page in a new window.
In Internet Explorer, use "Ctrl"+"D" to add the current page to your Favorites.
This and many more keyboard shortcuts can be found by going to Internet Explorer, clicking the "Help" menu, then selecting "Contents and Index". From the table of contents, open "Accessibility" and click "Using Internet Explorer keyboard shortcuts".
Back to Top
In Internet Explorer, hold the "Shift" key while turning the mouse wheel to go forwards or backwards.
In Internet Explorer, hold the "Shift" key while clicking on a link to open the Web page in a new window.
In Internet Explorer, use "Ctrl"+"D" to add the current page to your Favorites.
This and many more keyboard shortcuts can be found by going to Internet Explorer, clicking the "Help" menu, then selecting "Contents and Index". From the table of contents, open "Accessibility" and click "Using Internet Explorer keyboard shortcuts".
Back to Top
Tuesday, March 01, 2005
How to Delete Temporary Files...
Click on your start button, then go to "Search", then "All files and folders"......in this "Find All Files" dialog box, make sure where it says "look in" that you enter your search object into "All or part of the file name"and that it is looking at your C: drive (or, if you have multiple hard drives or partitions, be sure "All Local Drives" is selected) and be sure there is a check in the box next to where it says "include subfolders" (scroll down to "More Advanced Options" to find this).....Now, click your mouse pointer in the box that says "Type of File" and type the following, exactly as it is here. *.tmp
Once it finds all the files, it will list them in the box below and at the bottom it will tell you how many it found. Hit ctrl+A to select them all, then hit your delete key. If it won't delete some of them, that's because they are attached to some program running in the background, so you may have to delete them one at a time. All of these files are safe to delete. Once they are all deleted, you can save this process as an Icon on your desktop so you can repeat it with one click. Still inside the "Find All Files" box, go to the File menu (on the top toolbar) and click on "Save Search". This will put an icon on your desktop that you can click on any time you want to delete temps again!
Back to Top
Once it finds all the files, it will list them in the box below and at the bottom it will tell you how many it found. Hit ctrl+A to select them all, then hit your delete key. If it won't delete some of them, that's because they are attached to some program running in the background, so you may have to delete them one at a time. All of these files are safe to delete. Once they are all deleted, you can save this process as an Icon on your desktop so you can repeat it with one click. Still inside the "Find All Files" box, go to the File menu (on the top toolbar) and click on "Save Search". This will put an icon on your desktop that you can click on any time you want to delete temps again!
Back to Top
Monday, February 28, 2005
"Control Key" shortcuts
The "Control" keys are located at the bottom left and right corners of the main portion of your keyboard and can perform many functions once you know how. Here are some "shortcuts" to get you on your way!
Control + Esc: Displays the Start menu.
Control + Z: Undoes last command.
Control + B: Bolds highlighted text.
Control + U: Underlines highlighted text.
Control + I: Italicizes highlighted text.
Control + A: Selects all items in current window.
Control + Tab: Moves through Property tabs.
Control + F: Opens the Find window. Type in what you're searching for.
Control + F4: Closes current window in multiple document interface (MDI) programs such as MS Word and Excel
Back to Top
Control + Esc: Displays the Start menu.
Control + Z: Undoes last command.
Control + B: Bolds highlighted text.
Control + U: Underlines highlighted text.
Control + I: Italicizes highlighted text.
Control + A: Selects all items in current window.
Control + Tab: Moves through Property tabs.
Control + F: Opens the Find window. Type in what you're searching for.
Control + F4: Closes current window in multiple document interface (MDI) programs such as MS Word and Excel
Back to Top
Wednesday, February 16, 2005
Change The Desktop Theme
Did you know that you can use a desktop theme to personalize the appearance of windows? Each desktop theme contains several coordinated items, including a desktop background, screen saver, colors, sounds, mouse pointers, icons and fonts. Here's the way to spice up your desktop!
Right-click a blank area on your desktop and a menu appears. Click "Properties" and the "Display Properties" dialog box appears. Click the "Themes" tab, and click in the search box under the word "Theme" to display a list of the available desktop themes and click the desktop theme you want to use. The center display area will now show you a preview of the desktop theme you selected. Click "OK" to confirm your change and windows will apply the theme you selected. To return to the original theme proceed as above but select the theme you were originally using.
Themes available are usually shown with names such as "My Current Theme", "Windows Classic" and "More themes online". You can use this last option to find additional themes on the Internet. The Microsoft Internet Explorer window will display a web page that allows you to obtain additional themes, or you can find themes using a traditional web search engine like Google, for instance. If you make any changes to any theme, such as changing the desktop background, a new theme appears with the word "Modified" in it's name. You can rename this "Modified" theme to any name of your choosing.
Have some fun with this one and see what you can come up with!
Back to Top
Right-click a blank area on your desktop and a menu appears. Click "Properties" and the "Display Properties" dialog box appears. Click the "Themes" tab, and click in the search box under the word "Theme" to display a list of the available desktop themes and click the desktop theme you want to use. The center display area will now show you a preview of the desktop theme you selected. Click "OK" to confirm your change and windows will apply the theme you selected. To return to the original theme proceed as above but select the theme you were originally using.
Themes available are usually shown with names such as "My Current Theme", "Windows Classic" and "More themes online". You can use this last option to find additional themes on the Internet. The Microsoft Internet Explorer window will display a web page that allows you to obtain additional themes, or you can find themes using a traditional web search engine like Google, for instance. If you make any changes to any theme, such as changing the desktop background, a new theme appears with the word "Modified" in it's name. You can rename this "Modified" theme to any name of your choosing.
Have some fun with this one and see what you can come up with!
Back to Top
Monday, February 07, 2005
Remove The Animated Dog From Your Search! (Windows XP)
When you search for an item in Windows XP, an animated dog automatically appears in the Search Companion to work as your search assistant. If you find the animated dog annoying or distracting, you can remove it from the Search Companion. To remove the screen character from your search, you need to change your search preferences. The other available search options will not be affected by this removal. Here's how you do it!
Click "Start", then "Search" and the Search Results window appears. Now scroll down and click "Change Preferences" and a list appears displaying the various ways you can customize the Search Companion. Click "Without an animated screen character" to remove the animated dog from your screen and the animated dog will leave your search window.
If you decide to keep an animated character in the Search Companion, but don't want the dog, you can choose from several other search characters. To display a different animated character, perform the first few steps but click on "With a different character". Use the "Back" and "Next" buttons to scroll through the available characters, then click "OK" to select the one you want to use.
You can bring back an animated character at any time by clicking "With an animated screen character". The last screen character that you used will reappear and you will have to change to another if this is not the character you want to use.
Now you can perform a search or simply close the search window. Now, wasn't that easy?
Back to top
Click "Start", then "Search" and the Search Results window appears. Now scroll down and click "Change Preferences" and a list appears displaying the various ways you can customize the Search Companion. Click "Without an animated screen character" to remove the animated dog from your screen and the animated dog will leave your search window.
If you decide to keep an animated character in the Search Companion, but don't want the dog, you can choose from several other search characters. To display a different animated character, perform the first few steps but click on "With a different character". Use the "Back" and "Next" buttons to scroll through the available characters, then click "OK" to select the one you want to use.
You can bring back an animated character at any time by clicking "With an animated screen character". The last screen character that you used will reappear and you will have to change to another if this is not the character you want to use.
Now you can perform a search or simply close the search window. Now, wasn't that easy?
Back to top
Wednesday, February 02, 2005
Delete Temporary Files Automatically
You can make Internet Explorer automatically delete files in the Temporary Internet Files folder by doing the following -
While in Internet Explorer, click on "Tools", then on "Internet Options" in the drop-down menu. Now click on the "Advanced" tab and scroll down to the "Security" section and put a checkmark in the box beside "Empty Temporary Internet Files Folder When Browser Is Closed". That was easy, wasn't it?
Back to top
While in Internet Explorer, click on "Tools", then on "Internet Options" in the drop-down menu. Now click on the "Advanced" tab and scroll down to the "Security" section and put a checkmark in the box beside "Empty Temporary Internet Files Folder When Browser Is Closed". That was easy, wasn't it?
Back to top
Wednesday, January 19, 2005
SpellBound for Firefox - New Version
Version 0.7.3 of SpellBound, the spellchecker for Firefox , is now available for download. Open Firefox, go to "Tools", then scroll down to "Extensions", then click "Update" (the middle button). This will enable you to download and install the new version right over top of the older version. When you have completed this, you will have to restart Firefox to activate the new version. Now go to your "Extensions" again and make sure the version shown is SpellBound 0.7.3. Now you're all done and properly updated. It's that easy!
Back to top
Back to top
Tuesday, January 11, 2005
Spell-Checker for Notepad & Wordpad
You have probably found that Notepad and Wordpad do not have a SpellChecker included. However, I have found this SpellChecker add-on that will do the trick for you. It's called Tiny Spell. Click on the title line of this posting and you can download the installation file. If your firewall asks you if it's okay to change settings, say yes. When you have opened and installed this program you will have the installation file on your desktop which you can drag and drop into your "My Documents" folder for safekeeping and also a desktop icon (which you probably won't need and you can right-click and delete if you want) . This will leave you with a blue and white icon at the bottom of your screen (with a checkmark and the letters TS - for Tiny Spell I guess). From now on, as you are typing in Wordpad, Notepad or most other Microsoft programs you will hear a beep and the icon will turn yellow if it detects a misspelled word. When this happens, click on the icon and a page will pop-up with suggested corrections to the last word you just typed. When you pick a correction or ignore and move on the icon will turn blue-white again waiting for the next word as you go along. I have just installed this to try and it works great! Price: FREE!!! Hope this helps you out.
Back to top
Back to top
Tuesday, January 04, 2005
GMail Invitations!
I have a limited number of Gmail invitations available for those who may want one. Email me with your reason why you should be one of those lucky people that get an invitation to open their own Google GMail account and I'll send you one (until I run out, of course). Click on the title of this posting. First come - first served!
Back to top
Back to top
Monday, January 03, 2005
Was Santa Good to You? New LCD Monitor?
Here we are already into January 2005 and I hope Santa was especially good to you. One of the most asked for and received items at Christmas for the true computer geek is a flat-panel LCD monitor. If you were one of the lucky ones to receive this then this item is for you. The first thing you will notice is that LCD displays are much easier on the eyes after prolonged use. This is because the customary flicker of CRT monitors is not apparent on an LCD. Secondly, you'll wonder how you ever got along without all that extra space on your desktop that an LCD will give you. LCDs also run a lot cooler than CRTs and heat is the enemy of electronics, so this cooler running temperature is another advantage for LCD displays.
I use Windows XP for my operating system and I have found that the text on my LCD monitor can be improved by using ClearType, a font smoothing program that comes with XP. If you have XP you can turn on ClearType as follows: go to "Start", then "Control Panel", then the "Display" applet, then "Appearance", then "Effects", and then "Use the Following Method to Smooth Edges of Screen Fonts", and select "ClearType" from the dropdown menu, then "Apply" and then "OK". You can turn ClearType off again if you decide you don't want to use it by simply re-selecting "Standard" from the drop-down menu and then clicking on "OK".
I note that ClearType is available from Microsoft as a separate download for those who don't have it and as a downloadable portion of the "Microsoft PowerToys" program. Additional information is available about ClearType in my Sunday, August 8, 2004 posting on this subject. Enjoy your new clarity of vision and start wishing for the good stuff for next year!
More info available HERE
Back to top
I use Windows XP for my operating system and I have found that the text on my LCD monitor can be improved by using ClearType, a font smoothing program that comes with XP. If you have XP you can turn on ClearType as follows: go to "Start", then "Control Panel", then the "Display" applet, then "Appearance", then "Effects", and then "Use the Following Method to Smooth Edges of Screen Fonts", and select "ClearType" from the dropdown menu, then "Apply" and then "OK". You can turn ClearType off again if you decide you don't want to use it by simply re-selecting "Standard" from the drop-down menu and then clicking on "OK".
I note that ClearType is available from Microsoft as a separate download for those who don't have it and as a downloadable portion of the "Microsoft PowerToys" program. Additional information is available about ClearType in my Sunday, August 8, 2004 posting on this subject. Enjoy your new clarity of vision and start wishing for the good stuff for next year!
More info available HERE
Back to top
Thursday, December 16, 2004
Update, Update, Update
The holiday season is upon us once again and, while most of us enjoy the festivities and the company of our friends, there is a segment of our fellow man who's contribution is to try to make things just a little bit worse than they really are. These are the virus writers and they take pleasure in ruining things for folks they don't even know. The good news, is that you don't have to be infected with their garbage. If I sound ticked off, that's because I am.
The best way to win this game is simply not to play. Have a good antivirus program and make sure it's always up to date. Antivirus companies are usually very good at finding solutions for these viruses, and usually very quickly, but all their work does no good if you haven't updated your antivirus definitions. So, check the title of this item again. Remember, if you haven't taken precautions and you get infected with a virus, there are virus removal tools available for free from all major antivirus companies. It's also a good idea to create a snapshot of your system, after you have insured it's virus free, using the system restore programs found in Windows. In XP, this is found as follows: Start, All Programs, Accessories. System Tools, and finally System Restore. Your Windows version may be slightly different but it's worth locating this program and using it.
Another important thing to remember. Don't open any attachment from anyone you don't know. It could be anything and opening the item is a sure way to find out. Even if the item comes from someone you do know, it's always a good idea to screen the item before opening it with your antivirus program and to make sure the sender was really the person you know. Remember that the sender (your friend) may not even know that the message contains a virus unless he also has screened it. Some viruses are forwarded because part of the virus program pulls names and email addresses from your address book and automatically sends itself to every email address found without you knowing it. So be kind to your friends. It's as easy for them to be a victim as it is for you. If you should get something nasty from them, let them know gently that they have unwittingly been used and advise them about the offending item so they can delete it and clean their system. Be prepared to do the same for them if you unknowingly become the bad guy and send something along to your friends.
Caution, security and understanding are the secrets of a happy online holiday season. Be part of the joy!
Back to top
The best way to win this game is simply not to play. Have a good antivirus program and make sure it's always up to date. Antivirus companies are usually very good at finding solutions for these viruses, and usually very quickly, but all their work does no good if you haven't updated your antivirus definitions. So, check the title of this item again. Remember, if you haven't taken precautions and you get infected with a virus, there are virus removal tools available for free from all major antivirus companies. It's also a good idea to create a snapshot of your system, after you have insured it's virus free, using the system restore programs found in Windows. In XP, this is found as follows: Start, All Programs, Accessories. System Tools, and finally System Restore. Your Windows version may be slightly different but it's worth locating this program and using it.
Another important thing to remember. Don't open any attachment from anyone you don't know. It could be anything and opening the item is a sure way to find out. Even if the item comes from someone you do know, it's always a good idea to screen the item before opening it with your antivirus program and to make sure the sender was really the person you know. Remember that the sender (your friend) may not even know that the message contains a virus unless he also has screened it. Some viruses are forwarded because part of the virus program pulls names and email addresses from your address book and automatically sends itself to every email address found without you knowing it. So be kind to your friends. It's as easy for them to be a victim as it is for you. If you should get something nasty from them, let them know gently that they have unwittingly been used and advise them about the offending item so they can delete it and clean their system. Be prepared to do the same for them if you unknowingly become the bad guy and send something along to your friends.
Caution, security and understanding are the secrets of a happy online holiday season. Be part of the joy!
Back to top
Tuesday, November 23, 2004
Create a Personalized Sound Scheme for your computer!
You can create a personalized sound scheme for your computer by having Windows play specific sounds when certain events occur. Assigning new sounds to events can make Windows more entertaining and interesting.
You can assign sounds for up to 40 different events on your computer. Here's how you do it. Click "Start" then click "Control Panel" and when the Control Panel window appears, click "Sounds, Speech and Audio Devices". The Sounds, Speech and Audio Devices window appears. Click "Change the Sound Scheme" (the Sounds and Audio Devices Properties dialog box appears). Go to the "Sounds" tab and on the lower portion of the page you will see the "Program events" box that lists the events that you can assign sounds to. A speaker icon appears beside each event that plays a sound. To assign a sound to a particular event, click the event, then click "Browse" to search for the sound you want to use. The "Browse for" dialog box appears. The "Look in" box will allow you to search your entire computer for sound files. If you have downloaded sounds from the internet and saved them to your hard drive, you can also assign them to various computer events. Keep in mind that sound files downloaded from the internet must be in the "Wave" format, that is, they must have the".wav" extension, such as "chimes.wav". Now click the sound you want to play each time the event occurs. Click on the arrow next to "Preview" to test play the sound. Click "OK" to confirm your selection and "OK" again to confirm your changes.
Now you have a computer with a sound scheme unlike any other computer in the world and customized to your specific choices. How cool is that!
Back to top
You can assign sounds for up to 40 different events on your computer. Here's how you do it. Click "Start" then click "Control Panel" and when the Control Panel window appears, click "Sounds, Speech and Audio Devices". The Sounds, Speech and Audio Devices window appears. Click "Change the Sound Scheme" (the Sounds and Audio Devices Properties dialog box appears). Go to the "Sounds" tab and on the lower portion of the page you will see the "Program events" box that lists the events that you can assign sounds to. A speaker icon appears beside each event that plays a sound. To assign a sound to a particular event, click the event, then click "Browse" to search for the sound you want to use. The "Browse for" dialog box appears. The "Look in" box will allow you to search your entire computer for sound files. If you have downloaded sounds from the internet and saved them to your hard drive, you can also assign them to various computer events. Keep in mind that sound files downloaded from the internet must be in the "Wave" format, that is, they must have the".wav" extension, such as "chimes.wav". Now click the sound you want to play each time the event occurs. Click on the arrow next to "Preview" to test play the sound. Click "OK" to confirm your selection and "OK" again to confirm your changes.
Now you have a computer with a sound scheme unlike any other computer in the world and customized to your specific choices. How cool is that!
Back to top
Friday, November 12, 2004
Firefox 1.0 Now Available For Download
Be advised that Firefox Version 1.0 has now been released and Firefox 1.0 P.R. (pre-release) is now obsolete. Version 1.0 can be installed right over the pre-release version and your settings will be retained. However, if you have downloaded and installed the extensions for (a) Windows Update (b) SpellBound (Spell Checker) and (c) Autofill you will find that they have been "grayed-out" and are listed on your "Extensions" list (go to Firefox Tools and then Extensions) as not being compatible with Version 1.0 while, in fact, they have simply not been approved yet but are really compatible. Go to http://www.beggarchooser.com/firefox near the bottom of the page for Windowsupdate 1.0. You may have to give Firefox permission to download this file on a dropdown menu and Windows may ask you for a program to "open this file" so pick Firefox. You will have to re-install the SpellBound spellchecker from the site link shown on the previous SpellBound posting, and Autofill, if you also have it, can be found at http://autofill.mozdev.org/ and downloaded and installed from that site. You will also notice that, if you previously had installed the "Googlebar" extension, it is now missing. It is available for download again and Version 0.9.0.30 is compatible with Firefox 1.0 and can be downloaded from http://googlebar.mozdev.org/installation.html. After each has been successfully downloaded, Firefox will have to be restarted for the installation to be completed. Have fun updating!
Back to top
Back to top
Sunday, November 07, 2004
Add A SpellChecker To Firefox
I have worked my fingers to the bone and found a spellchecker called "Spellbound" which can be added to Firefox. It consists of three separate small downloads, all found at this site and available for both Windows and Mac (http://spellbound.sourceforge.net/install.html#header ) which you download and install into Firefox. After installing, shut down and restart Firefox, then right-click on the toolbar, click "Customize" and you will see the "Spellbound" icon on the dropdown page that appears. You must "drag and drop" the icon from this dropdown page to a blank spot on the toolbar, then click "done" on the dropdown page. Now, whatever you are typing (this is called "having focus") can be checked for spelling by merely clicking on the Spellbound icon. The Spellbound icon will appear "grayed-out" until you have typed something onto a page. This typing then gives the program some text to "have focus" on. Now you have a SpellChecker that will work for any program that you browse to using Firefox! Note that this item is not yet on the official Firefox list of extensions. Neat, huh?
Back to top
Back to top
Monday, November 01, 2004
News About AVG Antivirus Version 6.O FREE Edition
Just a quick note to those of you out there who may be using AVG 6.0 Free Edition. This edition will be discontinued and removed from use at the end of this year (Free Edition ONLY), because AVG is doing a massive update with many changes to their method of antivirus protection and the 6.0 Free Edition cannot be changed to reflect the improved methodology that will be used. However, the good news is that AVG will be issuing AVG 7.0 Free Edition, which does have the new methodology included, and it will be available, according to Grisoft (AVG) in November. I have included a live link (http://free.grisoft.com/freeweb.php/doc/1/) to the AVG page you will need to visit for complete information. I believe that you will have to uninstall AVG 6.0 Free before you will be able to install AVG 7.0 Free Edition when it is released. When the new edition is released, instructions should be posted on the AVG site advising how to obtain and install it. I hope this helps you out! Terry
____________________________________________________________________
Addendum: Thursday, November 11, 2004
Just to let you know that AVG 7.0 Free Edition has now been issued. Installing this version will automatically uninstall any previous version you may have. Terry
Back to top
____________________________________________________________________
Addendum: Thursday, November 11, 2004
Just to let you know that AVG 7.0 Free Edition has now been issued. Installing this version will automatically uninstall any previous version you may have. Terry
Back to top
Monday, October 25, 2004
When Windows Will Not Start Properly!
If Windows will not start properly, you may be able to start Windows in "Safe Mode" to try to correct the problem. To start Windows in Safe Mode, you must log on using a computer administrator account. Windows automatically creates this account that you can use if your own account is unavailable.
To get into Safe Mode turn on your computer and monitor, immediately press and hold down the F8 key. The Windows Advanced Options Menu appears, displaying a list of options for starting Windows. To Start Windows in Safe Mode press the arrow-down or the arrow-up key until you highlight Safe Mode. Then press the "Enter" key. Windows asks you to select the operating system you want to start. Use the up and down key until you highlight your operating system and press "Enter". Now the Windows Welcome screen appears. Click on the account you want to use in Safe Mode. A dialog appears stating that Windows is running in Safe Mode. Click "Yes" to continue. Note that Safe Mode uses only the minimum capabilities to run Windows so some hardware devices (printers, modems, sound cards, and some types of mice) may not be available when you start in Safe Mode.
In Safe Mode, try reversing the action that may have caused the problem that is preventing Windows from starting properly. If you have just installed a new program, then try uninstalling that program. You can also use the "System Restore" feature to return you computer to a time before the problem occurred. (All Programs, Accessories, System Tools, System Restore).
If you're still not sure how to fix the problem, you can start your computer using the "Last Known Good Configuration" option. This option allows you restore the settings Windows used the last time your computer started successfully. When you finish fixing the problem that prevented Windows from starting normally, restart your computer.
Now, wasn't that a lot easier and cheaper than calling in a computer service person?
Back to top
To get into Safe Mode turn on your computer and monitor, immediately press and hold down the F8 key. The Windows Advanced Options Menu appears, displaying a list of options for starting Windows. To Start Windows in Safe Mode press the arrow-down or the arrow-up key until you highlight Safe Mode. Then press the "Enter" key. Windows asks you to select the operating system you want to start. Use the up and down key until you highlight your operating system and press "Enter". Now the Windows Welcome screen appears. Click on the account you want to use in Safe Mode. A dialog appears stating that Windows is running in Safe Mode. Click "Yes" to continue. Note that Safe Mode uses only the minimum capabilities to run Windows so some hardware devices (printers, modems, sound cards, and some types of mice) may not be available when you start in Safe Mode.
In Safe Mode, try reversing the action that may have caused the problem that is preventing Windows from starting properly. If you have just installed a new program, then try uninstalling that program. You can also use the "System Restore" feature to return you computer to a time before the problem occurred. (All Programs, Accessories, System Tools, System Restore).
If you're still not sure how to fix the problem, you can start your computer using the "Last Known Good Configuration" option. This option allows you restore the settings Windows used the last time your computer started successfully. When you finish fixing the problem that prevented Windows from starting normally, restart your computer.
Now, wasn't that a lot easier and cheaper than calling in a computer service person?
Back to top
Wednesday, October 06, 2004
Close Down A Misbehaving Program
When a program fails to respond to mouse or keyboard actions, Windows will generally identify the program that is misbehaving, or you may discover the program for yourself.
To close a misbehaving program, press and hold down the "Ctrl" and "Alt" keys as you press the "Delete" key. (This key combination is laughingly called "The Three-Fingered Salute). The Windows Task Manager window appears. Click on the "Applications" tab. The menu that appears lists the programs that are currently running. The phrase "Not Responding" appears beside the name of the misbehaving program. Highlight this program and then click"End Task" near the bottom of the page. The "End Program" dialog box appears stating that the program is not responding. Click "End Now" to close the program. Close the Task Manager's window.
Note that when you close a program that is not responding, you will lose any information that you did not save in the program. Closing a misbehaving program should not affect the operation of Windows or any other program you have open.
This is a really handy tip to learn and with the tendency of Windows programs to freeze for no apparent reason, it's something you might use quite a bit.
Back to top
To close a misbehaving program, press and hold down the "Ctrl" and "Alt" keys as you press the "Delete" key. (This key combination is laughingly called "The Three-Fingered Salute). The Windows Task Manager window appears. Click on the "Applications" tab. The menu that appears lists the programs that are currently running. The phrase "Not Responding" appears beside the name of the misbehaving program. Highlight this program and then click"End Task" near the bottom of the page. The "End Program" dialog box appears stating that the program is not responding. Click "End Now" to close the program. Close the Task Manager's window.
Note that when you close a program that is not responding, you will lose any information that you did not save in the program. Closing a misbehaving program should not affect the operation of Windows or any other program you have open.
This is a really handy tip to learn and with the tendency of Windows programs to freeze for no apparent reason, it's something you might use quite a bit.
Back to top
Tuesday, September 21, 2004
Got a Digital Camera? Here's Great News!
If you have a digital camera, then you have been looking for a good photo program to go with it. Take a look at "Picasa". This program has been described as "the program that should have come with your digital camera, but didn't". Picasa has been around for a long time and was previously a "shareware" program but the good news is, it was just purchased by Google and the full program is now FREE (a price I really like). Picasa has the ability to scan your hard drive for all the images you have and to organize them into albums by date or by an album name that you supply. It can be configured to recognize duplicates and only load them once. You can even fix some photo errors in Picasa without changing the original photos, such as cropping your photo to a size you like or red-eye removal, just to name a couple. In addition, it comes with a program called "Hello", also FREE which will allow you to send photos via Email. Hello will even allow you to upload photos to a website just as easily. Why not check it out? Just click on the title line of this posting. It's a live link that will take you to the Picasa website. I hope you enjoy it as much as I do!
____________________________________________________________________
Addendum: Wednesday,January 26, 2005
Picasa 2.0.0 (much improved) has been released today. Just download the new version right over the old version and have some fun exploring all the new things you can do. FREE doesn't get any better than this!
Back to top
____________________________________________________________________
Addendum: Wednesday,January 26, 2005
Picasa 2.0.0 (much improved) has been released today. Just download the new version right over the old version and have some fun exploring all the new things you can do. FREE doesn't get any better than this!
Back to top
Monday, September 13, 2004
Perhaps A Safer Browser Is For You!
If you still feel less than confident about your computer's security while you browse the web, then maybe a browser without many of the security problems of Internet Explorer is for you. If you think this might be the case, read on!
Mozilla.org has released their new browser "Firefox" for public use. It is, of course, free to download and use and is very easy to customize for your own personal use. I have been using it on an experimental basis for some time now and I must say I like it a lot. So far I have not found anything that Firefox will not do and do well. At the moment I am using Firefox as my default browser and only time will tell if I continue to do this or move back to SlimBrowser.
Comparatively, Firefox seems to be faster than either SlimBrowser, Internet Explorer or Netscape. Just thought I'd let you know that this browser is out there and may well be worth taking a look at.
If you're interested, click on the link to go to the Firefox download site. Have fun!
Back to top
Mozilla.org has released their new browser "Firefox" for public use. It is, of course, free to download and use and is very easy to customize for your own personal use. I have been using it on an experimental basis for some time now and I must say I like it a lot. So far I have not found anything that Firefox will not do and do well. At the moment I am using Firefox as my default browser and only time will tell if I continue to do this or move back to SlimBrowser.
Comparatively, Firefox seems to be faster than either SlimBrowser, Internet Explorer or Netscape. Just thought I'd let you know that this browser is out there and may well be worth taking a look at.
If you're interested, click on the link to go to the Firefox download site. Have fun!
Back to top
Wednesday, September 08, 2004
Did You Back Up?
It's probably not well known but it's not really IF you will have a hard drive failure but rather, WHEN. With this in mind, I refer you to my entry regarding the available backup tool for Windows XP Home. If you're not using Windows XP Home then try to find a backup program compatible with your operating system and use it!! Alas, a friend of mine did not do this and his hard drive just failed unexpectedly and he has lost everything on his computer including his operating system. Now he must have the operating system reinstalled and then try to remember all the programs he previously had and their passwords so that he won't have to pay for them all over again. Even if he succeeds he will still have to set them all up the way he wanted them to be before the system failure. Not fun at all and this one's going to cost him money.
So, I repeat again: Rule #1 - Backup, Backup, Backup. "Nuff said!
Back to top
So, I repeat again: Rule #1 - Backup, Backup, Backup. "Nuff said!
Back to top
Monday, August 30, 2004
Confirm Your E-Mail Has Been Received
Whenever you send an Email message, you can ask Outlook Express to request a "read receipt" for the message. A read receipt is a confirmation Email message that notifies you that the person to whom you sent your message has received and read the message. Requesting a read receipt allows you to confirm that the message was delivered properly, was opened on the recipient's computer, and what time this took place. Keep in mind that the recipient can choose whether or not to send a read receipt for the message.
Here's the way you do this! When composing a message click "Tools", then click "Request Read Receipt". A check mark will appear beside the Request Read Receipt option on the menu. When the recipient reads the contents of your Email, you may receive a confirmation message indicating the date and time the person read the message. P.S.: If you sent the message to more than one person, you will receive a separate confirmation message from each person who chose to send a confirmation. How cool is that?
Back to top
Here's the way you do this! When composing a message click "Tools", then click "Request Read Receipt". A check mark will appear beside the Request Read Receipt option on the menu. When the recipient reads the contents of your Email, you may receive a confirmation message indicating the date and time the person read the message. P.S.: If you sent the message to more than one person, you will receive a separate confirmation message from each person who chose to send a confirmation. How cool is that?
Back to top
Sunday, August 15, 2004
Add A Backup Utility to Windows XP Home
For those folks out there preparing for the upcoming release of Windows XP Service Pack 2, you may want to back up your stuff before beginning this installation. Windows XP Professional has an excellent backup utility built into it but, alas, it is missing in Windows XP Home Edition. But, before you throw yourselves off a cliff in despair, I have good news! The backup utility is available for download and installation (thanks to: http://www.onecomputerguy.com/software/ntbackup.msi who has done all the work in providing this item) so I would recommend that, if you would like to have this utility in XP Home, you can. Download it from the aforementioned site and the utility will install. Now in XP Home, when you go to All Programs, Accessories, System Tools you will see a new entry called "Backup". Use it in good health!
Back to top
Back to top
Thursday, August 12, 2004
E-Mail a Link or Webpage
You can E-mail a link to a webpage or the webpage itself to another person from the internet without having to open Outlook Express. When you E-mail the webpage the recipient will be able to view the whole webpage within the E-mail and when you E-mail a link the recipient will be able to use the link to open the page in their own web browser.
Here's how you can do it! E-Mail a Webpage: Find the page you want to E-mail to another person. Click on the little envelope at the top of your Internet Explorer browser (if you're using SlimBrowser click on the little arrow just to the right of the little envelope) and a drop-down menu appears. Click on "Send Page" to send a copy of the current webpage and Outlook Express will fill in the subject. Type the E-mail address of the recipient and click "Send" to send the message.
E-Mail a Webpage Link: Proceed as above except that when the drop-down menu appears click "Send a Link" instead. A window will appear showing a message stating that the webpage is attached. Again, Outlook Express will fill in the subject. The area labeled "Attach" will show the name and size of the attachment. Address and "Send" as before.
Couldn't be much simpler, could it?
Back to top
Here's how you can do it! E-Mail a Webpage: Find the page you want to E-mail to another person. Click on the little envelope at the top of your Internet Explorer browser (if you're using SlimBrowser click on the little arrow just to the right of the little envelope) and a drop-down menu appears. Click on "Send Page" to send a copy of the current webpage and Outlook Express will fill in the subject. Type the E-mail address of the recipient and click "Send" to send the message.
E-Mail a Webpage Link: Proceed as above except that when the drop-down menu appears click "Send a Link" instead. A window will appear showing a message stating that the webpage is attached. Again, Outlook Express will fill in the subject. The area labeled "Attach" will show the name and size of the attachment. Address and "Send" as before.
Couldn't be much simpler, could it?
Back to top
Sunday, August 08, 2004
Improve The Appearance of Text
In Windows XP you can use ClearType to smooth out the edges of fonts, making the text on your screen easier to read. This works best for flat-screen monitors. By default, Windows selects the standard smoothing method which usually is best for CRT desktop monitors.
Here's how you use ClearType: Right-click a blank area of your desktop and, on the menu that appears, click "Properties" and the Display Properties dialog box appears. Now click the "Appearance" tab and then scroll down and click the "Effects" tab to change the visual effects in Windows. When the Effects dialog box appears put a checkmark in the box beside "Use the following method to smooth the edges of screen fonts". Now go down to the area which shows the way you want Windows to smooth the edges of screen fonts and click "ClearType". Click "OK" to confirm the change and "OK" again to close the Display Properties dialog box. Simple, isn't it?
Get more info HERE
Back to top
Here's how you use ClearType: Right-click a blank area of your desktop and, on the menu that appears, click "Properties" and the Display Properties dialog box appears. Now click the "Appearance" tab and then scroll down and click the "Effects" tab to change the visual effects in Windows. When the Effects dialog box appears put a checkmark in the box beside "Use the following method to smooth the edges of screen fonts". Now go down to the area which shows the way you want Windows to smooth the edges of screen fonts and click "ClearType". Click "OK" to confirm the change and "OK" again to close the Display Properties dialog box. Simple, isn't it?
Get more info HERE
Back to top
Friday, July 30, 2004
Display Cool Shortcut Icons
Change the icons for shortcuts on your desktop to personalize your computer. You can recognize a shortcut icon by its arrow in the bottom left corner. When changing shortcut icons, Windows provides you with icons you can choose from. Icons included with Windows are stored on your computer at C:\WINDOWS\system32\shell32.dll and C:\WINDOWS\system32\moricons.dll . You can also find loads of free icons on the web. One of the places to looks is http://www.iconarchive.com (click on this link or on the title line of this posting) . Note: When you're downloading icons from the web, be sure the icons have either the .exe, .ico or .dll extensions for them to work.
Here's how you do it! Right-click the shortcut whose icon you want to change. A menu appears. Click "Properties" to view the properties of the shortcut. The "Properties" dialog box appears. Click the "Shortcut" tab and then click "Change Icon" to change the icon for the shortcut. The "Change Icon" dialog box appears. Click the icon you want to use. (If you do not see the icon you want to use, click "Browse" to locate the icon you want to use on your computer). Click "OK" to confirm your selection then click"OK" again to close the "Properties" dialog box. The shortcut now displays the new icon.
You can also change the icon for a folder on your computer that is not a shortcut. Right-click the folder you want to change and select "Properties". In the Properties dialog box, click the "Customize" tab and click the "Change Icon" button. Then select and install your icon as outlined earlier.
Back to top
Here's how you do it! Right-click the shortcut whose icon you want to change. A menu appears. Click "Properties" to view the properties of the shortcut. The "Properties" dialog box appears. Click the "Shortcut" tab and then click "Change Icon" to change the icon for the shortcut. The "Change Icon" dialog box appears. Click the icon you want to use. (If you do not see the icon you want to use, click "Browse" to locate the icon you want to use on your computer). Click "OK" to confirm your selection then click"OK" again to close the "Properties" dialog box. The shortcut now displays the new icon.
You can also change the icon for a folder on your computer that is not a shortcut. Right-click the folder you want to change and select "Properties". In the Properties dialog box, click the "Customize" tab and click the "Change Icon" button. Then select and install your icon as outlined earlier.
Back to top
Friday, July 23, 2004
Accelerate Your Downloads
Fresh Download speeds up your internet downloads by opening several connections at once. A must have - it really works! No adware and no spyware! Free from Fresh Devices.com. While you're at the Fresh Devices site be sure to look at the other FREE programs they offer. They will even notify you by Email when updates and/or upgrades to their products are available.
Back to top
Back to top
Monday, July 12, 2004
Plug Another Windows Hole!
Security sage Steve Gibson has created a free program that automatically disables Microsoft's Universal Plug and Play. Download UnPlug 'n' Pray from grc.com/UnPnP/UnPnP.htm.
Back to top
Back to top
Keep Hackers Out!
Some features of Windows can open your system to hackers and viruses like the Windows Scripting Host.
Symantec offers a free program to disable Windows Scripting Host at www.symantec.com/avcenter/noscript.exe.
Back to top
Symantec offers a free program to disable Windows Scripting Host at www.symantec.com/avcenter/noscript.exe.
Back to top
Friday, July 09, 2004
Find Movie Blunders (Fun Stuff)
Track movie blunders at movie-mistakes.com. The Matrix is the current mistake-ridden film with 147 blunders cataloged, but many other big hits make the list. Did you notice that one of the passengers in Titanic is wearing a digital watch? Neither did I.
Back to top
Back to top
Thursday, July 08, 2004
My Personal Webpage - "My Moments"
I now have my personal webpage up and running. After you have finished here, please visit me there and leave a message in my Guestbook. Click on the title line of this posting or type http://west3660.tripod.com/mymoments to reach the new site. Hope to see you there.
Back to top
Back to top
Friday, July 02, 2004
Know what you've got with Belarc Advisor!
Download the Belarc Advisor (FREE) and have it scan your computer. It will list all the software and hardware you have installed with dates, versions, serial numbers, etc. Handy to have in case you have to format and re-install or just for your information. Just make a copy and stash it away someplace safe and you'll have it all together in one place. Handy!
Back to top
Back to top
Monday, June 28, 2004

Monday, June 21, 2004
Can't make it run?
If you're having trouble getting an older program to run on Windows XP, try the Program Compatibility Wizard. Click "Start", "All Programs", "Accessories", and then select "Program Compatibility Wizard". It doesn't work with every program, but it can often help.
Back to top
Back to top
Get back!
Been out web surfing and now find yourself lost? Here's a quick way to get back to your home page. Press "Alt" and "Home" at the same to take you right back home.
Back to top
Back to top
Friday, June 11, 2004
Use Photos as Slide Show Screensaver (XP)
First, select the pictures you want to use and set up a special folder with those pictures in it and make a note of where you saved that folder (in what place, on what drive, and so on). You will need this info later.
Next, go to your Desktop, and right-click on the Desktop.
Scroll down to "Properties", click the "Screensaver" tab. Toward the middle of this dialog box there is a drop-down box with the words "Screen Saver". Scroll down that box until you see the "My Pictures Slideshow" and click it. To the right of this drop-down box is a button that says "Settings". Click it.
You should see the words "Use pictures in this folder" and a "Browse" button. Click this button. This is where you look for that file you created earlier with all the digital pictures that you want to use for the screensaver slideshow. After you have found the file folder with with your pictures, click "OK".
You can now adjust how fast you want the pictures to change and so on, Then click "OK" again. This brings you back to the "Display Properties" dialog box and you can see your screensaver pictures. Click "OK" and you're all finished.
(Thanks to: Nedda H. of Palm Harbor, Florida for this tip)
Back to top
Next, go to your Desktop, and right-click on the Desktop.
Scroll down to "Properties", click the "Screensaver" tab. Toward the middle of this dialog box there is a drop-down box with the words "Screen Saver". Scroll down that box until you see the "My Pictures Slideshow" and click it. To the right of this drop-down box is a button that says "Settings". Click it.
You should see the words "Use pictures in this folder" and a "Browse" button. Click this button. This is where you look for that file you created earlier with all the digital pictures that you want to use for the screensaver slideshow. After you have found the file folder with with your pictures, click "OK".
You can now adjust how fast you want the pictures to change and so on, Then click "OK" again. This brings you back to the "Display Properties" dialog box and you can see your screensaver pictures. Click "OK" and you're all finished.
(Thanks to: Nedda H. of Palm Harbor, Florida for this tip)
Back to top
Thursday, June 03, 2004
Attaching files to Email
To attach a file to an Email in Outlook or Outlook Express, click the paper-clip icon, choose the file and click "OK". Repeat to attach additional files.
Remember to let the recipient know you'll be sending an attached file - it's dangerous to open unexpected attachments especially if you don't recognize the sender and, even if you do, exercise some caution. And try to keep the total size below 1MB. If the files are bigger than that, consider sending them over a period of a few days.
Back to top
Remember to let the recipient know you'll be sending an attached file - it's dangerous to open unexpected attachments especially if you don't recognize the sender and, even if you do, exercise some caution. And try to keep the total size below 1MB. If the files are bigger than that, consider sending them over a period of a few days.
Back to top
Subscribe to:
Posts (Atom)